

This easy scone recipe makes tender, buttery scones with golden edges and a soft, flaky center. The key is simple: keep the butter cold, mix gently, and stop as soon as the dough comes together.
If you enjoy this cold-butter technique, try my 3 Ingredient Biscuit Recipe next.
Below, I’ll show you exactly how the dough should look and how to bake homemade scones successfully the first time.
Table of Contents
Quick Overview
| Detail | Information |
|---|---|
| Prep Time | 10 minutes |
| Chill Time | 30 minutes |
| Bake Time | 18–23 minutes |
| Total Time | 58–63 minutes |
| Yield | 12 scones |
| Oven Temperature | 425°F |
| Skill Level | Beginner |
| Best For | Breakfast, brunch, or an afternoon treat |
Why This Easy Scone Recipe Works
Scones do not require complicated pastry techniques. A few small details have a much bigger effect on the final texture than aggressive mixing or perfect shaping.
Cold Butter Creates Flaky Layers
The butter should still be cold when the scones enter the oven.
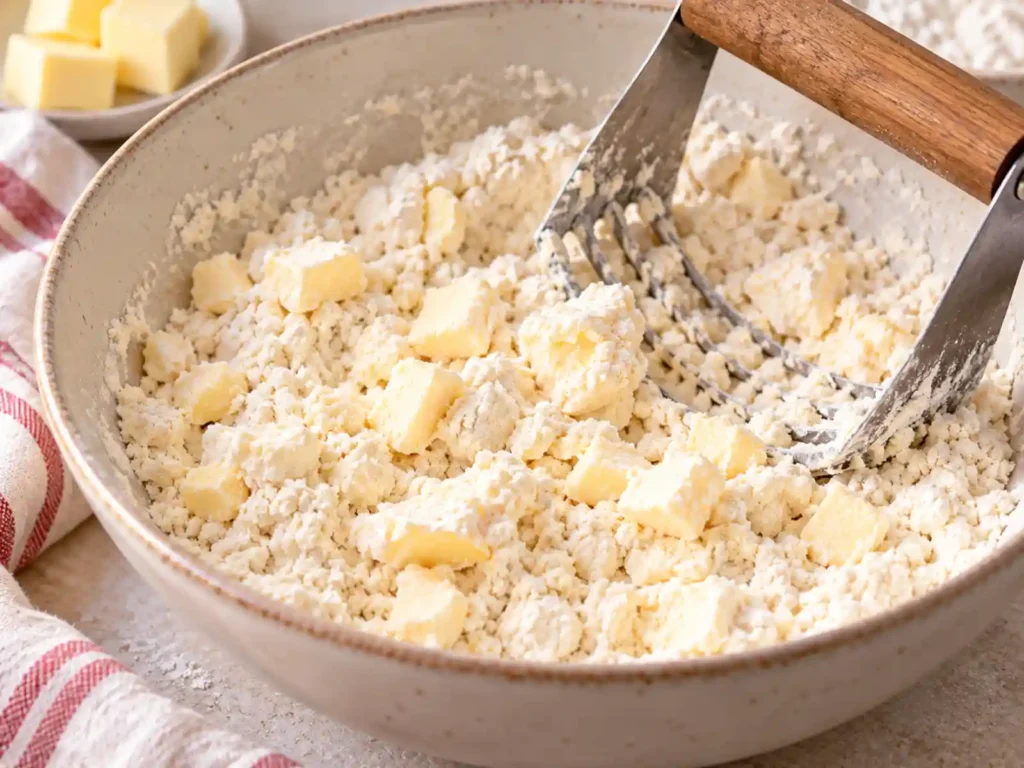
As you work it into the flour, you are not trying to blend it completely. The mixture should remain uneven, with lots of small crumbs and some visible pieces of butter roughly the size of peas.
Those cold pockets of butter melt during baking and help create a lighter, flaky texture.
If the butter becomes soft while you are working, the dough can become greasy and the scones are more likely to spread instead of rising neatly.
The same basic principle of keeping the butter cold and handling the dough gently is useful when making my 3 Ingredient Biscuit Recipe
Minimal Mixing Keeps Scones Tender
Once the liquid meets the flour, mix only as much as necessary.
The dough does not need to become smooth.
In fact, slightly rough dough is exactly what you want. Continued mixing and kneading develops more gluten, which can change a tender scone into something noticeably firmer and chewier.
Think of the goal as bringing the dough together, not kneading it.
Once there are no large pockets of loose flour and the dough can hold its shape when gently pressed, stop.
Thick Dough Helps the Scones Rise
Do not flatten the dough too much while shaping it.
For this recipe, each round should be approximately 3/4 inch thick before cutting.
A thicker round gives the scones room to rise upward and produces a more satisfying tender center.
If the dough looks slightly uneven or cracked around the edges, resist the temptation to keep pressing it flatter just to make it look prettier.
A Hot Oven Gives Them a Better Rise
The shaped scones chill for 30 minutes before baking, then go into a fully preheated 425°F oven.
That combination is important.
The chilling time firms the butter again after shaping, while the hot oven gets the baking process started quickly.
Make sure the oven is fully preheated before the chilled scones go in.
Ingredients for Easy Homemade Scones
This is a simple ingredient list, but each component plays an important role.
All-Purpose Flour
All-purpose flour gives the scones enough structure to rise while keeping the crumb tender.
If you have a kitchen scale, weighing the flour is the most reliable method. Too much flour can make the dough dry before it even reaches the oven.
Baking Powder
Baking powder provides the lift.
Because there is no yeast in this recipe, fresh baking powder is especially important. If yours has been sitting open in the cupboard for a long time, check it before relying on it for a fresh batch of scones.
Granulated Sugar
The sugar gives the scones a gentle sweetness without making them overly dessert-like.
The base is neutral enough to work with blueberries, chocolate chips, cinnamon, or lemon.
Salt
A small amount of salt balances the sweetness and keeps the butter and vanilla flavors from tasting flat.
Cold Unsalted Butter
Butter is one of the most important ingredients in this recipe.
Keep it refrigerated until you are ready to use it, then work it into the flour while it is still firm.
You want visible small pieces rather than a completely uniform flour-and-butter mixture.
Eggs
The eggs add richness and help bring the dough together.
Whisking them with the vanilla and dairy first helps distribute them evenly without requiring extra mixing once the wet and dry ingredients meet.
Milk or Half-and-Half
The recipe uses 1/2 to 2/3 cup milk or half-and-half, but that does not mean you should automatically pour in the entire amount.
Start with 1/2 cup.
Only add more if dry flour remains and the dough will not hold together.
Half-and-half gives the scones a slightly richer result, while milk also works well.
Vanilla Extract
Vanilla gives the plain scones enough flavor to be delicious on their own while keeping the base flexible enough for different add-ins.
How to Make Scones – Step by Step
Follow these steps carefully to get the best results from this easy scone recipe, paying particular attention to the dough texture and temperature.The most important part of learning how to make scones is knowing when to stop mixing and what the dough should look like.
Use the visual cues below rather than trying to make the dough perfectly neat.
1. Mix the Dry Ingredients
Add the all-purpose flour, granulated sugar, salt, and baking powder to a large mixing bowl.
Whisk until everything is evenly distributed.
Spend a few extra seconds breaking apart any obvious lumps of baking powder before adding the butter.
2. Cut in the Cold Butter
Add the cold butter to the flour mixture.
Use a pastry cutter, fork, or your fingertips to work it into the flour.
Stop when the mixture looks unevenly crumbly.
You should see:
- fine flour-coated crumbs
- some slightly larger crumbs
- a few visible pieces of butter about the size of peas
You should not have a smooth paste.
If you use your fingers, work quickly so the heat from your hands does not soften the butter.
If the butter starts feeling greasy or very soft, put the bowl in the refrigerator briefly before continuing.
3. Mix the Wet Ingredients
In a separate bowl or measuring jug, whisk together:
- the eggs
- vanilla extract
- 1/2 cup milk or half-and-half
Keep the remaining dairy nearby, but do not add it yet.
Starting with less liquid gives you much better control over the final consistency of the dough.
4. Add the Wet Ingredients
Pour the wet mixture into the bowl with the flour and butter.
Use a large spoon or bowl scraper to gently fold the mixture together.
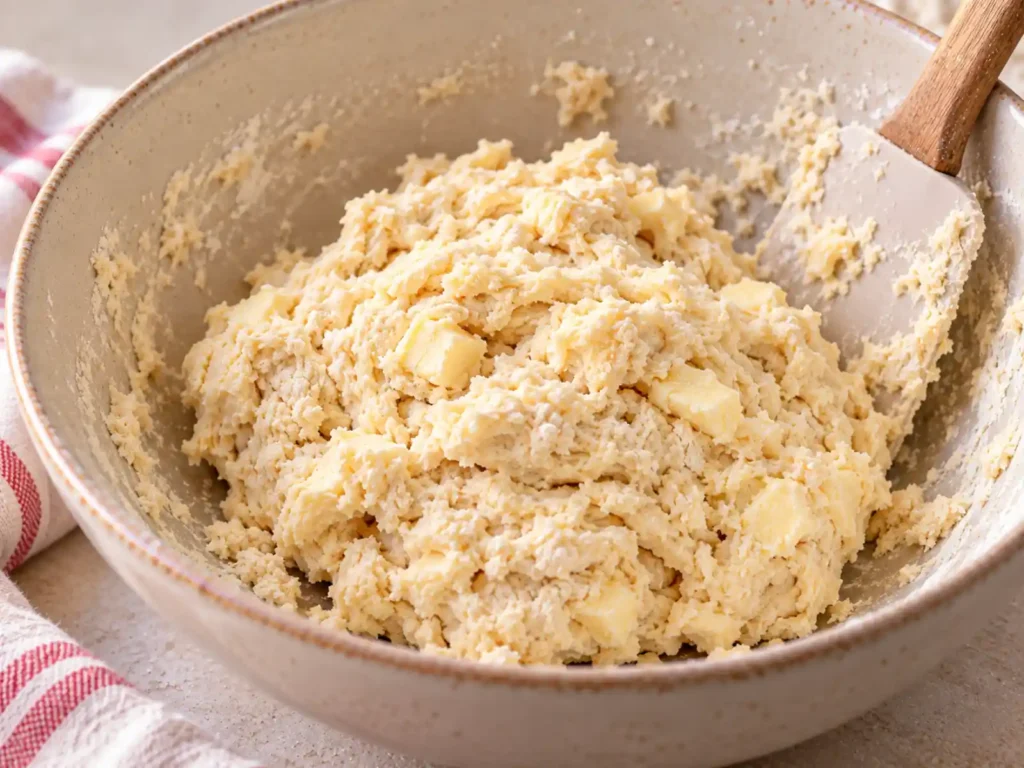
At first, it may look dry and irregular.
That is normal.
Continue folding gently until the flour begins forming larger moist clumps.
Do not immediately add more milk simply because the dough looks rough.
Give the flour time to absorb the liquid first.
If you still have a significant amount of dry flour at the bottom of the bowl and it refuses to join the dough when gently pressed, add a little more milk or half-and-half.
Do this gradually.
5. Bring the Dough Together
Once the mixture begins holding together, use your hands or a bowl scraper to gather the loose pieces into one mass.
This is where beginners often overwork the dough.
You are finished when the dough is:
- soft
- slightly shaggy
- cohesive
- lightly tacky rather than wet
- rough rather than perfectly smooth
A few cracks are completely fine.
Visible butter pieces are also fine.
Do not continue kneading until the surface becomes silky like bread dough.
Also avoid tasting the raw dough. Flour is a raw food, and the U.S. Food and Drug Administration advises against eating uncooked dough or batter containing raw flour. FDA guidance on handling flour safely
6. Shape the Dough
Line a baking sheet with parchment paper and lightly dust the surface with flour.
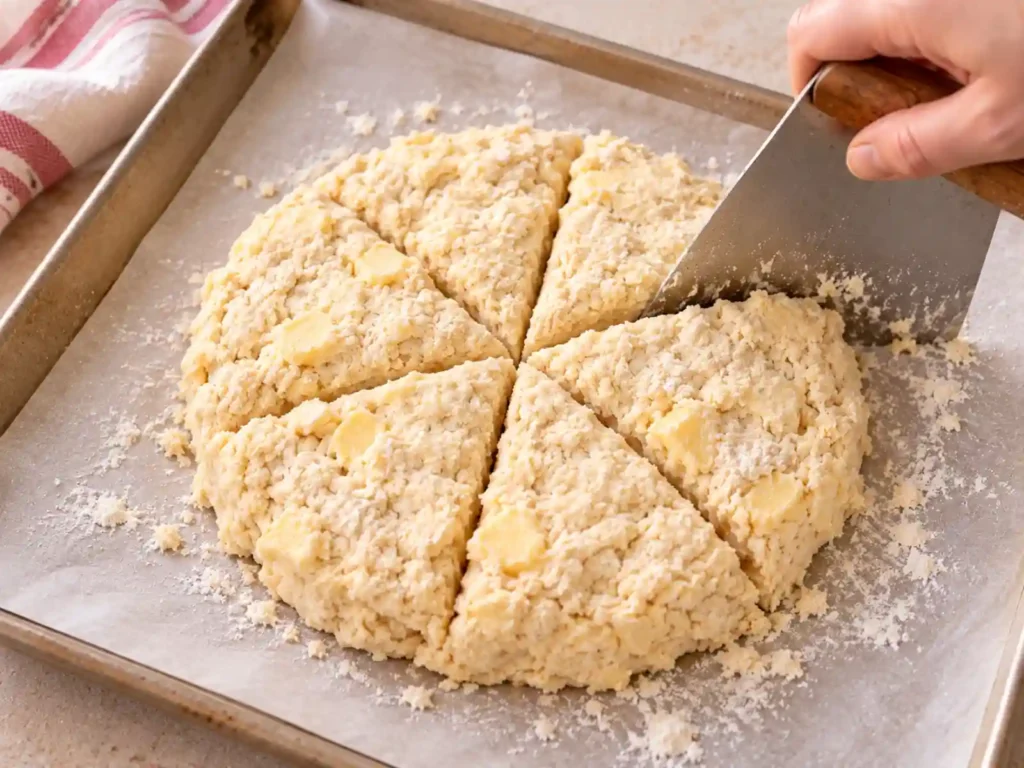
Transfer the dough to the prepared sheet and divide it into two equal portions.
Gently shape each portion into a round approximately 5 inches across and 3/4 inch thick.
Use your hands instead of repeatedly rolling the dough.
Press only firmly enough to make the pieces hold together.
Do not compress the dough unnecessarily or flatten the rounds because the tops look slightly uneven.
7. Cut Into Scones
Use a sharp knife or bench scraper to divide each round into 6 wedges.
You should have 12 scones total.
Cut straight down through the dough rather than sawing back and forth repeatedly.
Separate the outer edges of the wedges slightly so the individual scones have some room as they bake.
8. Brush and Chill
Brush the tops lightly with milk.
If you want a crisp, lightly sweet finish, sprinkle coarse sugar or cinnamon sugar over the tops.
Place the baking sheet in the freezer for 30 minutes.
While the scones chill, preheat the oven to 425°F with a rack positioned in the upper third of the oven.
Do not skip preheating. The scones should go from cold dough into a properly heated oven.
9. Bake Until Lightly Golden
Bake the chilled scones for 18 to 23 minutes.
Use the clock as a guide, but also look at the scones.
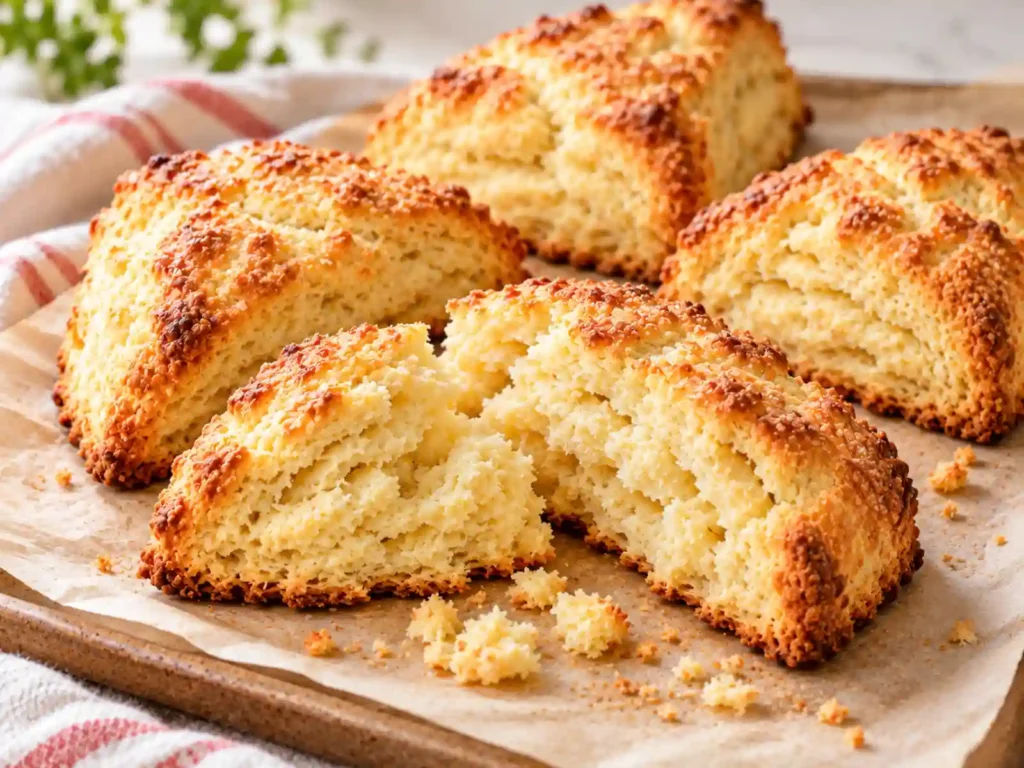
They are ready when:
- they have visibly risen
- the tops and edges are lightly golden
- the outside looks set rather than wet
- the center no longer appears shiny or doughy
If you gently separate two wedges near the center of a round, the inside edge should look baked through rather than like raw, sticky dough.
Do not wait for the entire exterior to become deeply brown. Leaving the scones in the oven too long can dry out the center.
Allow them to cool for a few minutes before serving.
What Should Scone Dough Look Like?
Good scone dough is not polished-looking dough.
Before shaping, it should be slightly shaggy, soft, cohesive, and somewhat rough.
You may still see little streaks or pieces of cold butter.
That is a good sign.
When you gently press the dough together, it should hold its shape without squeezing liquid onto your hands or falling apart into dry crumbs.
If Your Dough Is Too Wet
Dough that feels loose, shiny, or extremely sticky may contain too much liquid.
Wet dough can be difficult to shape and may spread more during baking.
If you have not added all the dairy yet, stop.
Give the flour a little time to absorb the moisture before deciding that anything needs fixing.
Avoid immediately dumping large amounts of extra flour onto the dough, which can create dry scones instead.
If Your Dough Is Too Dry
If the mixture completely falls apart whenever you try to press it together, it needs a little more liquid.
Add milk or half-and-half gradually.
A small amount may be enough.
The goal is not wet dough. You simply want enough moisture for the crumbs to become cohesive when pressed.
If Your Dough Becomes Smooth and Elastic
Stop mixing.
A smooth, stretchy dough usually means it has been handled more than necessary.
Unlike bread dough, scone dough does not benefit from extended kneading.
Slightly rough is better.
Easy Scone Recipe Variations

Once you have made the basic recipe successfully, you can use it as a starting point for a few simple variations.
Avoid adding several flavors at once. Too many mix-ins can make shaping more difficult and change the balance of the dough.
Blueberry Scones
Blueberries add bursts of fruit without requiring a completely different recipe.
Fold them in gently so you do not crush the berries and release too much juice into the dough.
Because fresh blueberries add moisture, pay especially close attention when adding the milk or half-and-half.
The finished dough should still match the soft, shaggy consistency described above.
Chocolate Chip Scones
Chocolate chips are one of the simplest beginner-friendly additions.
Stir them into the flour mixture before adding the wet ingredients so they are evenly distributed without requiring extra mixing later.
Then continue with the recipe normally.
Cinnamon Scones
Cinnamon works especially well with the buttery base.
It can be incorporated into the dry ingredients, or you can use cinnamon sugar over the tops before baking.
For more ideas that use the same warm spice, explore these best cinnamon recipes.
Lemon Scones
Finely grated lemon zest adds fresh flavor without introducing much additional liquid.
For better distribution, rub the zest into the granulated sugar before adding the sugar to the flour.
You can also finish cooled lemon scones with a simple glaze if desired. Wait until they have cooled so the glaze stays on top instead of melting immediately into the warm scones.
Common Scone Mistakes and How to Fix Them
When a batch does not turn out as expected, the shape and texture of the finished scones usually give you useful clues.
| Problem | Likely Cause | What to Do Next Time |
|---|---|---|
| Scones are flat | Dough was shaped too thin or baking powder was weak | Keep the rounds about 3/4 inch thick and use fresh baking powder |
| Scones spread | Butter became too warm or dough was too wet | Keep the butter cold, control the liquid, and chill before baking |
| Scones are dry | Too much flour, too little liquid, or overbaking | Measure flour carefully, adjust liquid gradually, and watch the visual doneness cues |
| Scones are tough | Dough was mixed or kneaded too much | Stop as soon as the dough becomes cohesive |
| Scones are crumbly | Dough did not have enough moisture | Add milk gradually until the dough holds when gently pressed |
| Dough is very sticky | Too much liquid or the dough became warm | Stop adding liquid and chill the dough if necessary |
| Tops brown before the centers are done | Oven may be running hot or browning unevenly | Check the oven temperature and begin checking the scones earlier |
Why Did My Scones Spread?
Warm butter is one of the first things to check.
If the butter has softened significantly before baking, it can begin melting too early.
Overly wet dough can cause a similar problem.
Next time, stop adding dairy as soon as the dough is cohesive and make sure the shaped scones get their full chilling time.
Why Are My Scones Dry?
Dry scones usually point to one of three issues:
too much flour, not enough liquid, or too much baking time.
The dough should not feel powdery when you shape it.
It should be soft enough to hold together without requiring a lot of pressure.
Also begin checking the scones near the lower end of the baking range rather than automatically leaving them in for the maximum time.
Why Are My Scones Tough?
The most likely cause is too much mixing.
Once you add the wet ingredients, every extra stir or round of kneading works the dough further.
Stop when everything holds together, even if the surface still looks rustic.
Trying to produce perfectly smooth raw dough often works against the tender texture you want after baking.
What to Serve With Scones

Fresh buttery scones are good enough to eat warm from the oven, but a few simple additions make them even better.
Butter, Jam, and Preserves
Split a warm scone and serve it with softened butter, jam, or homemade strawberry preserves
The lightly sweet base works especially well with a bright fruit spread.
Tea or Coffee
Scones also pair naturally with coffee or tea.
For something warmer and more aromatic, serve them with this homemade Chai Tea Latte Recipe.
The spices work particularly well with plain or cinnamon scones.
How to Store and Freeze Scones
These scones are best shortly after baking, when the outside still has a little texture and the center is tender.
You can still prepare them ahead successfully.
Room Temperature
Let the baked scones cool completely before storing them.
Place them in an airtight container and keep them at room temperature for short-term storage.
Sealing warm scones traps condensation, so make sure they have cooled first.
Refrigerator
Plain baked scones generally do not need refrigeration for ordinary short-term storage.
If you are preparing the dough ahead instead, the shaped dough can be wrapped well and refrigerated for up to 3 days before baking.
For longer storage, freezing is the better choice. This easy scone recipe also works well for make-ahead baking because both baked and unbaked scones can be frozen.
Freezing Baked Scones
Cool the baked scones completely.
Place them in a freezer-safe airtight container or bag and freeze for up to 1 month for the best quality.
If you want to remove only one or two at a time, freeze the scones separately first before placing them together in the storage container.
Freezing Scone Dough
You can also freeze the scones before baking.
Shape and cut them first, then freeze until firm.
Once frozen solid, transfer the individual pieces to a freezer-safe container or bag and keep them frozen for up to 1 month.
This is convenient when you want freshly baked scones without preparing an entire batch of dough in the morning.
How to Reheat Scones
For a texture closer to freshly baked, warm room-temperature scones in a 350°F oven for about 10 minutes.
The microwave is faster, but use short intervals. Overheating can make the crumb rubbery instead of tender.
Frequently Asked Questions
What is the secret to making good scones?
Keep the butter cold, avoid overworking the dough, and pay close attention to moisture.
The dough should be soft and cohesive but still rough and slightly shaggy.
Chilling the shaped scones before baking also helps keep the butter firm until the dough reaches the hot oven.
How do I make my scones rise and stay fluffy?
Use fresh baking powder, keep your butter cold, and do not flatten the dough too much.
For this recipe, shape the dough approximately 3/4 inch thick.
Also make sure the oven reaches 425°F before the scones go in. Starting in a properly preheated oven gives them the strong heat they need at the beginning of baking.
Should Scone Dough Be Wet or Dry?
Neither.
Proper scone dough should feel soft, slightly tacky, and cohesive.
It may have a rough surface and a few cracks, but it should hold together when gently pressed.
If loose dry crumbs refuse to join the dough, add a little more liquid.
If the dough is shiny, loose, and sticks heavily to your hands, it is too wet.
Can I Make Scones With Milk Instead of Heavy Cream?
Yes.
This recipe is specifically designed to use milk or half-and-half, so heavy cream is not required.
Half-and-half gives the scones a richer result, but milk works well.
Whichever you choose, begin with 1/2 cup and add more only when the dough actually needs it.
Can I Make Scone Dough Ahead of Time?
Yes.
Shape the dough, wrap it carefully, and refrigerate it for up to 3 days before baking.
If you need to prepare it further ahead, freeze the shaped scones instead.
Can You Freeze Scones Before Baking?
Yes.
Cut and shape the scones first, freeze them until firm, and then transfer them to a freezer-safe container.
They can be stored frozen for up to 1 month.
Freezing individual portions also lets you bake only as many as you need.
Why Are My Homemade Scones Dry?
Start by checking the flour measurement.
Too much flour makes it difficult to achieve a soft dough without adding excess liquid.
Overbaking can also dry the centers, so use the visual signs of doneness rather than waiting for the scones to become deeply brown.
Finally, avoid trying to fix a slightly sticky dough by repeatedly adding flour during shaping. A light dusting is enough.
More Easy Breakfast Recipes
If you enjoy simple homemade breakfasts, try these next:
- 3 Ingredient Biscuit Recipe for another beginner-friendly recipe built around cold butter and gentle handling.
- Fluffy Pancakes when you want a soft, classic breakfast that comes together quickly.
- Chai Tea Latte Recipe for a warm drink to serve alongside freshly baked scones.