
Halloween cake pops are the ultimate treat: cute, creepy, and way easier to make than they look. Whether you’re baking from scratch or using cake mix, these bite-sized desserts are guaranteed to impress.
In this guide, you’ll get five spooky decoration ideas, simple step-by-step instructions, and allergy-friendly options — so you can focus on the fun, not the fuss.
Table of Contents
Why These Halloween Cake Pops Are Different
Let’s face it — a lot of Halloween cake pop recipes out there feel… recycled. Same pumpkin shapes, same candy eyes, same instructions copied from a box of cake mix. This version breaks the mold — literally.
Here’s what makes these stand out:
- Two baking methods: Whether you’re a scratch baker or shortcut lover, you’re covered.
- Five unique designs: Go beyond the usual with ghosts, monsters, witches’ cauldrons, and more.
- Diet-friendly options: Easy swaps for gluten-free, dairy-free, or fully vegan versions.
- Party-proof tips: Need to make 50 for a school party? Want to freeze them ahead? You’ll know how.
- Troubleshooting built-in: No more cracked coating or cake balls falling off the stick.
This guide is built for real life — messy kitchens, busy schedules, and a little Halloween chaos. But the results? Pinterest-worthy. Scroll down to pick your favorite design or jump straight to the recipe.
Ingredients & Equipment
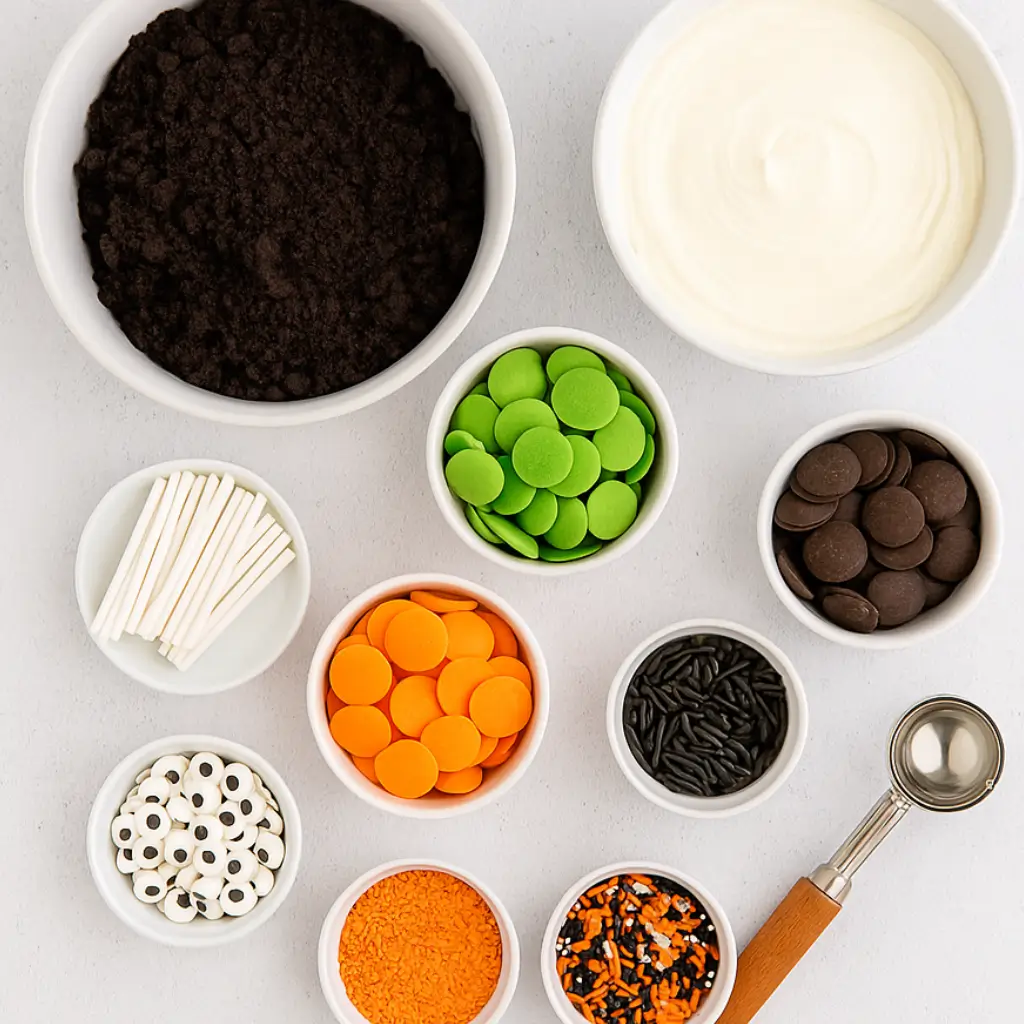
Option A – From Scratch
- 1 ½ cups all-purpose flour (or gluten-free blend)
- 1 cup granulated sugar
- ½ cup unsalted butter (room temp)
- 2 eggs
- ½ cup milk or dairy-free alternative
- 1 tsp vanilla extract
- 1 ½ tsp baking powder
- Pinch of salt
- Frosting: ½ cup buttercream or cream cheese frosting
Option B – Quick Version (Store-Bought Shortcut)
- 1 ready-made cake (any flavor)
- ½ cup pre-made frosting
Decoration Essentials
- Candy melts (white, orange, black, green, purple)
- Candy eyes
- Sprinkles (Halloween colors)
- Edible markers
- Lollipop sticks or wooden skewers
- Piping bags or ziplock bags
Tools You’ll Need
- Large bowl
- Scoop or tablespoon
- Baking tray + parchment
- Microwave-safe bowl
- Cooling rack or cake pop stand
- Styrofoam block for drying
Step-by-Step Instructions
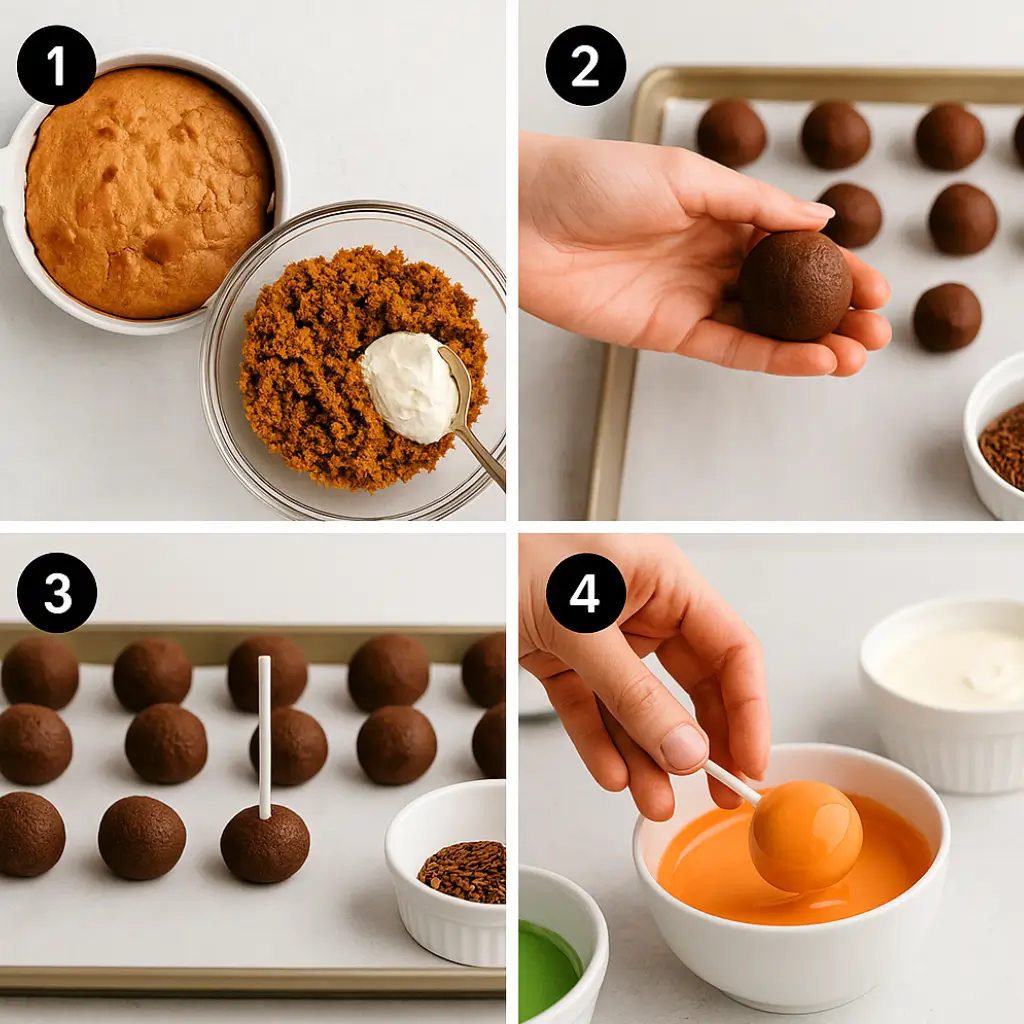
1. Bake (or Grab) the Cake
Bake from scratch or use store-bought cake. Let it cool completely.
2. Crumble & Mix
Crumble the cake, add frosting, and mix until it forms a dough.
3. Roll & Chill
Roll into balls, place on tray, and chill for 30 minutes.
4. Insert Sticks
Dip stick tips in melted candy and insert. Chill again.
5. Dip & Tap
Dip each pop in melted coating, tap off excess.
6. Decorate & Dry
Add sprinkles, eyes, or drizzle. Let dry upright.
Can I skip the stick and make truffle balls instead?
Yes — just place them in mini cupcake liners instead.
Troubleshooting & Pro Tips
Common Issues (And How to Fix Them)
- Cake pops falling: use less frosting, chill longer
- Cracked coating: pop too cold, coating too hot
- Thick melts: thin with coconut oil
- Coating won’t stick: dry surface + “glue” the stick with melts
- Sticky surface: avoid fridge condensation
Pro Tips
- Use a scoop for even balls
- Chill between every step
- Decorate while coating is wet
- Use a block to dry upright
What’s the best way to melt candy without ruining it?
Microwave in 30-sec intervals. Stop at 90% melted. Stir until smooth.
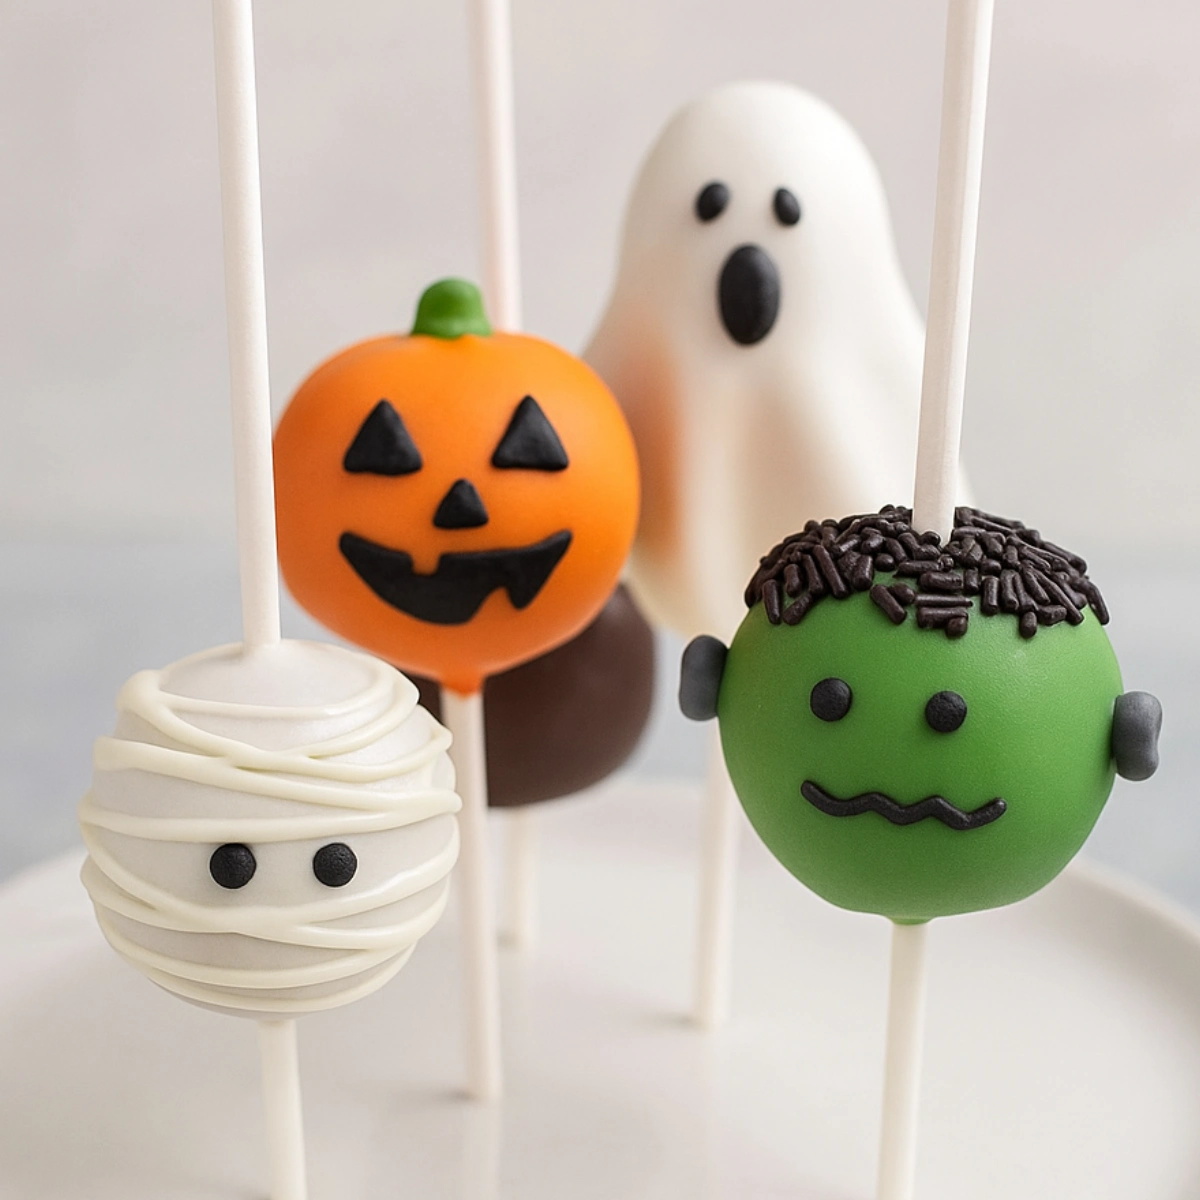
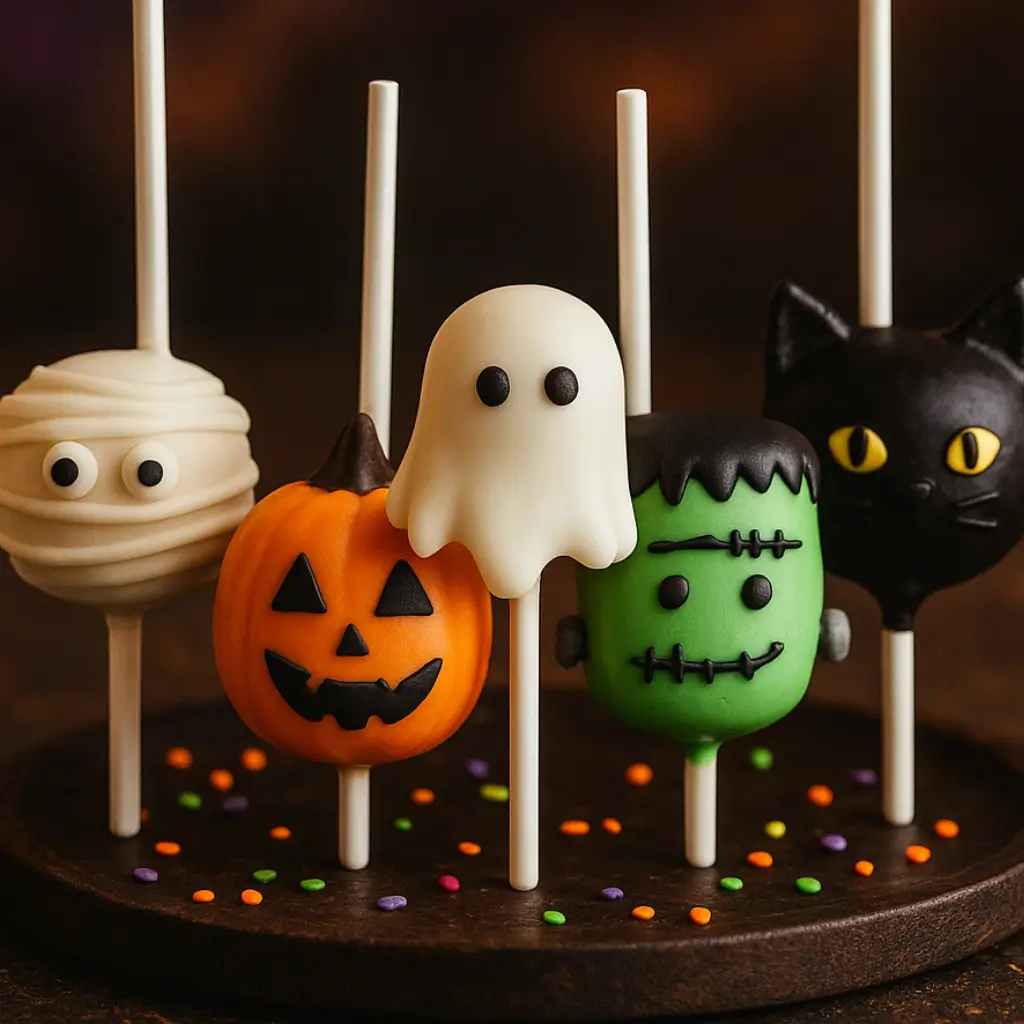
5 Spooky Decoration Themes
1. Pumpkin
Orange coating, green sprinkle stem, jack-o’-lantern face.
2. Ghost
White coating, marker face, marshmallow bump.
3. Monster
Colorful coating, candy eyes, sprinkles.
4. Mummy
White drizzle wrap, candy eyes.
5. Witch’s Cauldron
Dark coating, green sprinkles, pretzel broom.
Can I use natural food coloring instead of candy melts?
Yes, but use oil-based color for best results.
Gluten-Free & Vegan Variations
Gluten-Free
- GF cake mix
- Certified GF frosting, candy, and sprinkles
- For more tips, check the Beyond Celiac Gluten-Free Baking Guide.
Vegan-Friendly
- Vegan cake base (flax egg, non-dairy milk)
- Vegan frosting
- Vegan candy melts
- Gelatin-free decorations
Will gluten-free or vegan cake pops still hold together well?
Yes, if chilled and mixed properly.
Make Ahead, Storage & Party Tips
Make Ahead Timeline
- 3–4 days early: shape balls
- 1–2 days early: dip & decorate
- Day-of: serve at room temp
Storage Tips
- Before coating: fridge (4 days) or freeze (1 month)
- After coating: airtight at room temp (2–3 days)
- For safe storage tips, visit the FDA’s Holiday Food Safety Guide.
Transport & Display
- Use styrofoam or display stands
- Wrap in bags for party favors
Can I make cake pops a week in advance?
Yes, freeze uncoated pops, then thaw and decorate before serving.
Frequently Asked Questions
Can I freeze fully decorated cake pops?
You can, but coating may crack. Best to freeze before dipping.
What’s the best frosting for cake pops?
Thick buttercream or cream cheese. Avoid whipped toppings.
How many cake pops per cake?
One 9×13 cake = ~36 pops
Can I use regular chocolate?
Yes, but temper it. Candy melts are easier. See decorating ideas in Martha Stewart’s Cake Pop Guide.
Can kids help?
Definitely! Let them shape, dip, and decorate.
Nutrition & Serving Info
Per Pop (Average)
- Calories: 150–180
- Sugar: ~12g
- Fat: ~8g
Serving Suggestions
- 2–3 pops per child, 1–2 per adult
- Wrap for favors or bundle for gifts
Are cake pops healthier than cupcakes?
Not really. Smaller, yes — but still indulgent.
Conclusion: Get Spooky, Get Baking
Whether it’s googly-eyed monsters or classic mummies, cake pops are a Halloween hit. Let the kids help, make a mess, and enjoy every wonky eye or cracked pop.