

There’s something almost magical about biting into a peanut butter Easter egg. That thick chocolate shell, the soft, sweet filling inside it’s the kind of candy that makes Easter feel special. The good news? You can make them at home with a handful of ingredients, no baking required, and they honestly might taste better than the ones you buy at the store.
This homemade peanut butter Easter egg recipe is one of those treats you’ll want to make every year. Whether you’re filling Easter baskets, putting together a dessert tray, or just craving something chocolatey and sweet, these eggs are the answer.
Table of Contents
Why This Is the Peanut Butter Egg Recipe to Make for Easter
A softer, fresher homemade version of Reese’s-style eggs
Store-bought Reese’s peanut butter eggs are great, but there’s something different about homemade. The filling is softer, creamier, and tastes fresher because you’re making them yourself with real ingredients. There’s no waxy aftertaste, no mystery ingredients — just peanut butter, powdered sugar, butter, vanilla, and chocolate.
Better peanut butter-to-chocolate ratio than store-bought
One thing people love about this peanut butter egg recipe is that you get to control the ratio. If you want a thicker peanut butter filling with just a thin chocolate shell, go for it. Prefer more chocolate? Just add a second dip. Store-bought eggs have a fixed ratio you can’t change. Homemade ones are totally customizable.
Easy to make ahead for Easter baskets, gifting, or dessert trays
These are genuinely make-ahead friendly. You can prep them days in advance, store them in the fridge, and pull them out whenever you need them. They’re great for Easter baskets, edible gifts, or as part of a holiday candy spread — and they travel well in a container lined with parchment paper.
Are These Like Reese’s Peanut Butter Eggs?
What tastes similar
The flavor profile is very close to Reese’s. You’ve got sweet peanut butter filling paired with a milk chocolate coating, and that classic combination is hard to beat. If you use the right peanut butter and a good quality chocolate for dipping, you’ll be surprised at how similar the result is.
The biggest texture and sweetness differences
The main difference is texture. Homemade peanut butter eggs have a softer, almost fudge-like filling compared to the firmer, slightly drier center in Reese’s. They’re also a bit richer because of the butter in the filling. Some people find them sweeter — it really depends on how much powdered sugar you use.
How to make them taste more like Reese’s at home
To get closer to that true Reese’s copycat flavor, use a conventional creamy peanut butter (like Jif or Skippy), not natural peanut butter. The stabilized oils in regular peanut butter give you that dry, sweet, slightly salty filling that Reese’s is known for. A small pinch of salt also helps balance the sweetness and bring out the peanut flavor.
Quick Recipe Snapshot
Prep time, chill time, yield, and difficulty
- Prep time: 20–25 minutes
- Chill time: 30–60 minutes
- Yield: About 12–16 eggs, depending on size
- Difficulty: Easy — beginner-friendly, no baking required
Best make-ahead window
You can make these up to 5–7 days ahead and keep them refrigerated, or freeze them up to 2 months in advance.
What to expect from the filling and chocolate coating
The filling is smooth and creamy with a slight sweetness and good peanut flavor. The chocolate coating sets firm and snaps when you bite into it. Together, they create that satisfying chocolate-peanut butter experience everyone loves about Easter peanut butter candy.
Ingredients You Need for the Best Peanut Butter Eggs
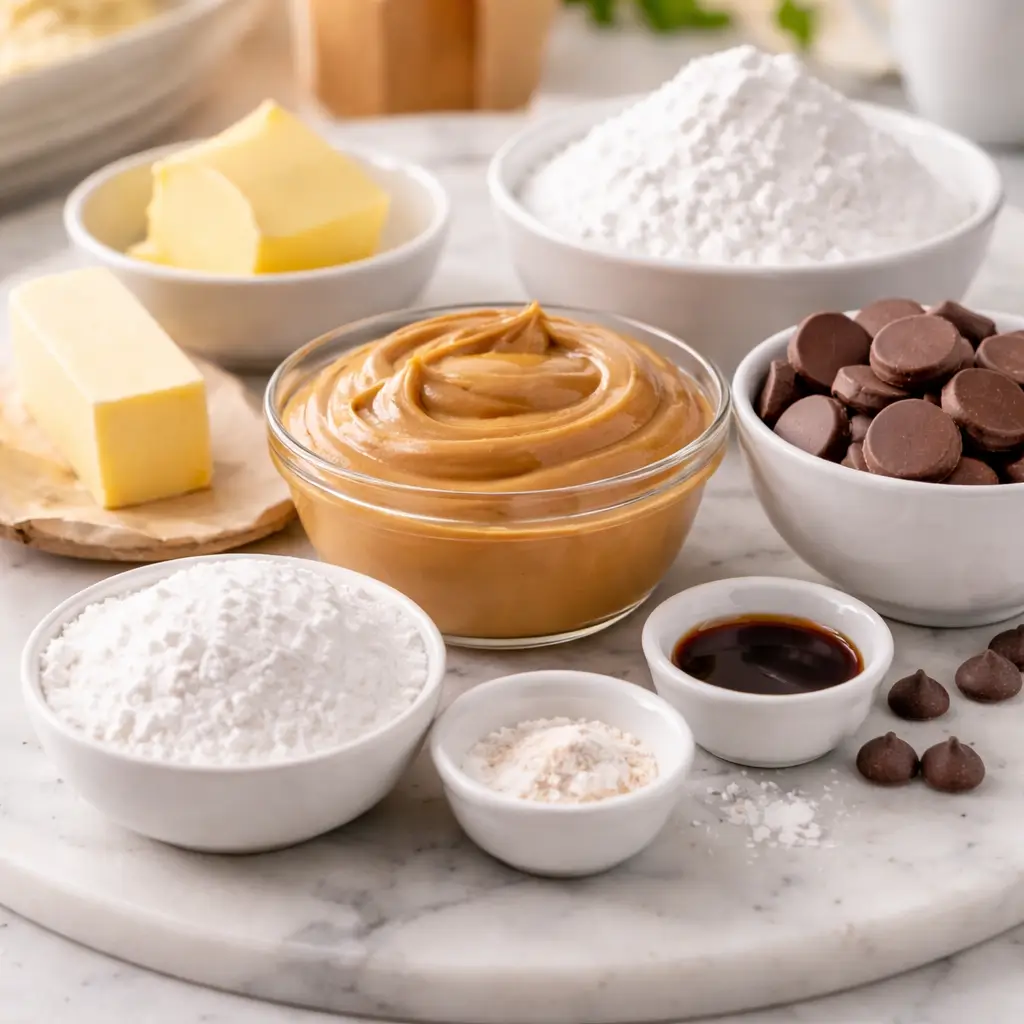
Best peanut butter for a true copycat texture
Use a creamy, conventional peanut butter like Jif, Skippy, or Peter Pan. These have added sugar and stabilizers that give the filling a smooth, workable texture that holds its shape when chilled. Natural peanut butter is oily and separates, which makes it harder to work with and can result in a greasy, soft filling.
Best chocolate for dipping, flavor, and finish
You have a few options here:
- Chocolate melting wafers (like Ghirardelli or Wilton) are the easiest to work with because they’re designed for dipping and set up smooth and glossy.
- Good-quality chocolate bars (milk or semi-sweet) melted down also work great and give a richer flavor.
- Candy melts are super easy but have a more artificial flavor — fine if you need convenience.
- Chocolate chips can be used in a pinch, but they need a small amount of coconut oil or shortening to thin them out for dipping.
Why powdered sugar, butter, vanilla, and salt matter
- Powdered sugar gives the filling its structure and sweetness. It dissolves smoothly, unlike granulated sugar.
- Butter adds richness and helps the filling hold together.
- Vanilla extract adds depth and rounds out the flavor.
- Salt is the secret weapon — even a pinch brings out the peanut flavor and cuts through the sweetness.
Optional ingredients for thinner coating, firmer filling, or extra flavor
- Coconut oil added to melted chocolate thins it out for easier dipping and a smoother finish.
- Graham cracker crumbs mixed into the filling add a slightly different texture and a subtle cookie flavor.
- Cream cheese (a small amount) can make the filling richer, but it changes the texture quite a bit.
Ingredient Choices by Outcome
For the closest Reese’s-style flavor and texture
Use Jif or Skippy creamy peanut butter, powdered sugar, softened butter, vanilla, and salt. Dip in milk chocolate melting wafers. This combination comes closest to that classic copycat Reese’s eggs flavor.
For easier dipping and smoother coating
Add 1–2 teaspoons of coconut oil to your melted chocolate. It thins it out perfectly and helps the coating set with a nice sheen.
For a less sweet or more peanut-forward version
Reduce the powdered sugar by 2–3 tablespoons and add a slightly heavier pinch of salt. You’ll get more peanut flavor with less sugar-forward sweetness.
What works in a pinch and what to avoid
- Works: Almond butter, cashew butter, sunflower seed butter in place of peanut butter
- Works: Candy melts, almond bark as a chocolate substitute
- Avoid: Natural peanut butter (too oily), chocolate chips without added oil (too thick for dipping)
How to Make Peanut Butter Easter Eggs Step by Step
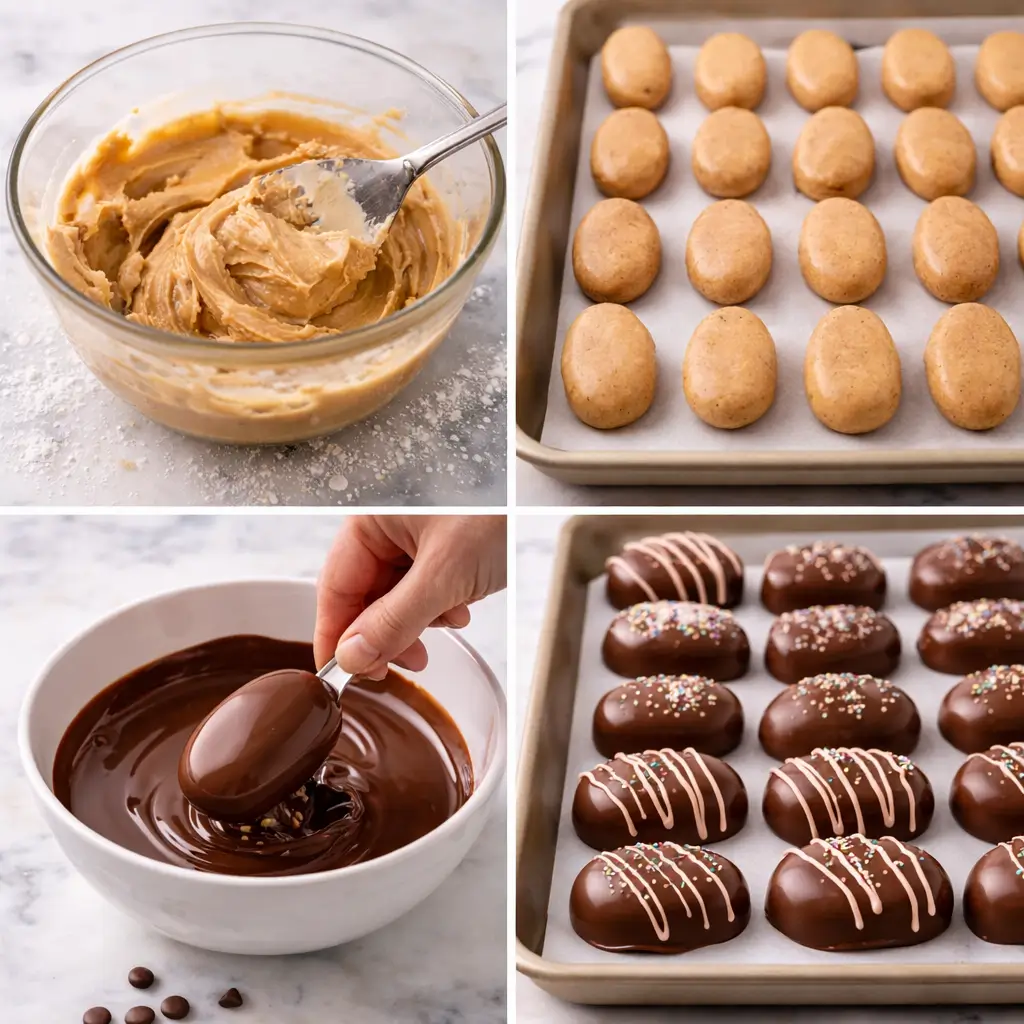
Mix the peanut butter filling
In a large bowl, mix together 1 cup of creamy peanut butter, 4 tablespoons of softened butter, 1 teaspoon of vanilla extract, and a pinch of salt. Stir until smooth. Gradually add 1½ to 2 cups of powdered sugar, mixing as you go, until the filling comes together into a soft, moldable dough. It should hold its shape when pressed but not feel dry or crumbly.
Shape the eggs
Scoop out about 2 tablespoons of filling per egg and roll it between your palms into a ball. Then gently flatten it and shape the ends into a slight point to form an egg shape. Place each one on a parchment-lined baking sheet. Repeat with the rest of the filling.
Chill until firm enough to dip
Put the shaped eggs in the fridge for at least 30–45 minutes. They need to be cold and firm before dipping, otherwise they’ll fall apart in the chocolate. You can also pop them in the freezer for 15–20 minutes if you’re in a hurry.
Melt the chocolate the right way
Melt your chocolate in a microwave-safe bowl in 30-second intervals, stirring between each round, until smooth. Don’t overheat it — chocolate burns quickly. Alternatively, use a double boiler on the stovetop for more control. If the chocolate feels too thick, stir in a teaspoon of coconut oil to loosen it up.
Dip, decorate, and let them set
Using a fork or dipping tool, lower each chilled egg into the melted chocolate. Lift it out, let the excess drip off, and place it back on the parchment-lined sheet. Decorate with sprinkles, a drizzle of white chocolate, or a sprinkle of sea salt while the chocolate is still wet. Let them set at room temperature or in the fridge until firm.
How to Know Each Step Is Going Right
What the filling should feel like before shaping
The filling should feel like soft cookie dough — pliable but not sticky. If it sticks to your hands, add a little more powdered sugar. If it crumbles, it’s too dry; add a teaspoon of peanut butter or a tiny splash of milk.
How firm the eggs should be before dipping
They should feel cold and hold their shape cleanly when you pick them up. If they feel soft or squish easily, give them more chill time. Warm eggs will lose shape and may fall apart in the chocolate.
What properly melted dipping chocolate should look like
It should be smooth, glossy, and flow off a spoon in a slow, steady ribbon. If it looks grainy, streaky, or lumpy, it may be overheated or have seized. Add a teaspoon of coconut oil and stir gently to help bring it back.
What a smooth finished coating should look like
A good coating will look glossy when wet and set to a smooth, matte or slightly shiny finish. If it looks streaky or rough, the chocolate was either too thick or the eggs were too warm.
Pro Tips for Smooth Chocolate Coating and Clean Egg Shapes
How to keep the chocolate thin, glossy, and easy to work with
Keep your chocolate warm while you work by placing the bowl over a pot of hot water. This keeps it at dipping consistency and prevents it from thickening too fast. Stir it frequently.
How to avoid thick bottoms, streaks, and messy edges
After dipping, tap the fork gently on the edge of the bowl to shake off extra chocolate. Then slide the egg off the fork with a toothpick or second fork. This gives you a cleaner bottom with less pooling.
Easy shaping and dipping tricks for beginners
Don’t stress about perfect shapes. Slightly imperfect eggs look charming and homemade. If the chocolate coating has drips or edges, a light touch with a toothpick can clean them up before the chocolate sets.
Troubleshooting Peanut Butter Eggs
Filling too soft or sticky
Add more powdered sugar, one tablespoon at a time, until the mixture holds its shape. Chill the dough for 15 minutes before shaping if it feels too warm.
Filling too dry or crumbly
Add a teaspoon of peanut butter or a small splash of milk and mix until it comes together. Over-adding powdered sugar is the most common cause.
Chocolate too thick, clumpy, or hard to dip in
Stir in coconut oil (start with 1 teaspoon) and reheat gently. If the chocolate has seized from water contact, there’s not much you can do — start fresh with new chocolate.
Eggs losing shape, cracking, or leaking
They weren’t chilled enough. Put them back in the freezer for 10–15 more minutes and try again.
Coating looks dull, rough, or uneven
This usually means the chocolate cooled too quickly or the eggs were too cold when dipped. Let the eggs sit at room temperature for 5 minutes after coming out of the fridge before dipping.
Variations and Substitutions That Actually Work
Milk chocolate, dark chocolate, white chocolate, or mixed finishes
All three work beautifully with peanut butter filling. Dark chocolate gives a more intense, less sweet result. White chocolate is sweeter and pairs nicely with a sea salt finish. You can also do half-and-half dips for a decorative two-tone look.
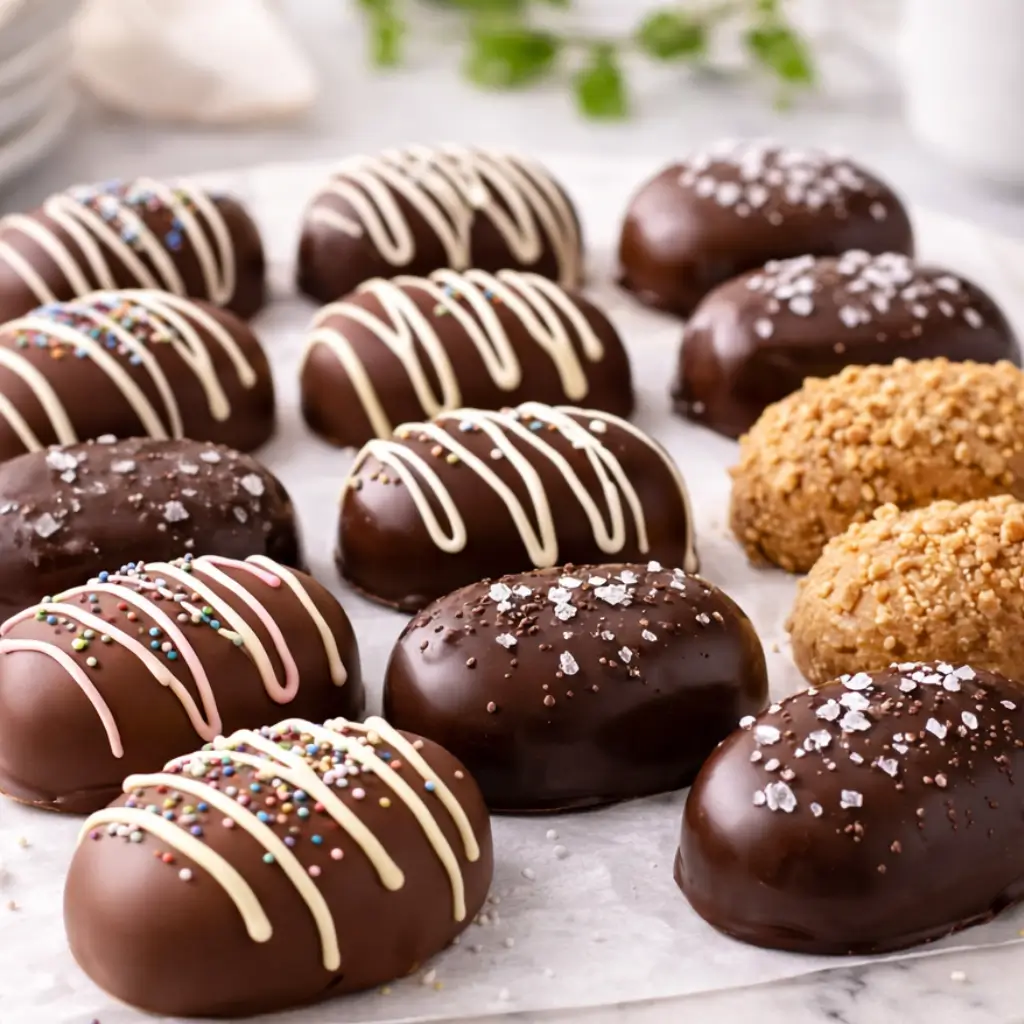
Crunchy peanut butter, graham cracker crumb, or sea salt versions
Swap creamy for crunchy peanut butter for added texture. Mix in 2 tablespoons of graham cracker crumbs for a slightly different flavor — it’s surprisingly good. A flake of sea salt on top of the finished egg elevates the whole thing.
Almond butter, cashew butter, or sunflower seed butter options
These all work as direct substitutes for peanut butter. The texture may vary slightly, and the flavor will be different, but the process is the same. Sunflower seed butter is a great allergy-friendly option for school events or gifts.
Mini eggs, other holiday shapes, and simple decoration ideas
Make them smaller for bite-sized versions. Use a mold to get more uniform shapes if you want. Drizzle with contrasting chocolate, add Easter-colored sprinkles, or press a small candy on top before the chocolate sets.
If you love no-bake peanut butter treats, you’ll also love these Reese’s peanut butter no-bake bars — they’re just as easy and taste incredible.
Storage, Freezing, Make-Ahead, and Best Serving Texture
How long they last in the fridge
Stored in an airtight container in the fridge, homemade peanut butter Easter eggs last up to 2 weeks. Place parchment paper between layers to prevent sticking.
How to freeze them without sticking or cracking
Freeze them uncovered on a baking sheet first until solid (about 1–2 hours), then transfer to a zip-lock bag or airtight container. This prevents them from sticking together. They’ll keep well in the freezer for up to 2 months.
For longer storage, you can also wrap the candies well before freezing; MU Extension notes that homemade candies freeze well and can keep for up to 1 year.
How far ahead you can make them for Easter
You can make these up to a week ahead and refrigerate them, or 1–2 months ahead and freeze them. Just thaw in the fridge overnight before serving.
Best texture for serving straight from the fridge or after resting
Straight from the fridge they’ll be firm and snappy. For a softer bite that’s closer to room-temperature candy, let them sit out for 10–15 minutes before serving. Both are delicious — it really comes down to personal preference.
Frequently Asked Questions
Can I use natural peanut butter?
Natural peanut butter isn’t ideal for this recipe. Because it separates easily and has a higher oil content, the filling tends to be too soft and greasy to shape properly. Conventional creamy peanut butter like Jif or Skippy gives you the best texture for homemade peanut butter eggs.
What chocolate is best for dipping peanut butter eggs?
Chocolate melting wafers or chocolate melting discs are the easiest option. They melt smoothly, dip easily, and set with a nice finish. High-quality chocolate bars work great too and give a richer flavor. For the closest Reese’s-style result, use milk chocolate.
Can I use chocolate chips, candy melts, or almond bark?
Yes, all three work. Chocolate chips need a small amount of coconut oil or shortening added to thin them for dipping. Candy melts are convenient and easy but have a more artificial flavor. Almond bark is similar to candy melts and is widely available around Easter.
Can I make these without molds or special tools?
Absolutely. All you need is your hands, a baking sheet lined with parchment paper, and a fork for dipping. Hand-shaped eggs have a charming, homemade look that makes them feel even more personal.
Why is my filling too soft, too dry, or too sweet?
Too soft usually means not enough powdered sugar or the filling wasn’t chilled. Too dry means too much powdered sugar. Too sweet means the peanut butter-to-sugar ratio is off — try reducing the sugar slightly and adding a bigger pinch of salt.
Can I make them ahead and freeze them for Easter?
Yes! These freeze beautifully. Freeze them in a single layer first, then transfer to a freezer-safe container. Thaw overnight in the fridge before you plan to serve them.
How do I get a thinner shell like store-bought eggs?
Add coconut oil to your melted chocolate to thin it out. Dip once, let it set, then dip a second time if you want more coverage without a thick, heavy coating.

Homemade Peanut Butter Easter Eggs
Equipment
- Large Mixing Bowl
- Hand Mixer or Wooden Spoon
- Parchment-Lined Baking Sheet
- Microwave-safe bowl
- Fork or Dipping Tool
- Measuring Cups and Spoons
Ingredients
Peanut Butter Filling
- 1 cup creamy peanut butter Jif or Skippy recommended — avoid natural peanut butter
- 4 tablespoons unsalted butter softened to room temperature
- 1 teaspoon vanilla extract
- 1/4 teaspoon salt adjust to taste
- 1.5 cups powdered sugar sifted; add up to 2 cups for a firmer filling
Chocolate Coating
- 2 cups chocolate melting wafers or chopped chocolate milk chocolate recommended for closest Reese’s-style flavor
- 1-2 teaspoons coconut oil optional — adds for a thinner, glossier coating
Instructions
- Make the filling: In a large bowl, combine the creamy peanut butter, softened butter, vanilla extract, and salt. Stir until completely smooth and well combined.
- Add the powdered sugar: Gradually mix in the sifted powdered sugar, about half a cup at a time, until the mixture forms a soft, moldable dough. It should hold its shape when pressed but not feel dry or crumbly. If it’s too sticky, add a little more powdered sugar one tablespoon at a time.
- Shape the eggs: Scoop about 2 tablespoons of filling per egg. Roll each portion into a ball, then gently flatten and shape the ends into a slight point to form an egg shape. Place each one on a parchment-lined baking sheet.
- Chill until firm: Refrigerate the shaped eggs for 30 to 45 minutes, or until they feel cold and firm to the touch. Firm eggs hold their shape in the chocolate and are much easier to dip. If you’re short on time, freeze them for 15 to 20 minutes instead.
- Melt the chocolate: Place the chocolate melting wafers or chopped chocolate in a microwave-safe bowl. Microwave in 30-second intervals, stirring well between each round, until fully melted and smooth. If the chocolate feels too thick for dipping, stir in 1 to 2 teaspoons of coconut oil to thin it out.
- Dip and set: Using a fork or dipping tool, lower each chilled egg into the melted chocolate. Lift it out and gently tap the fork on the edge of the bowl to shake off excess chocolate. Slide the egg onto the parchment-lined sheet. Decorate immediately with sprinkles, a drizzle of white chocolate, or a flake of sea salt while the coating is still wet. Let the eggs set at room temperature or in the refrigerator until the chocolate is fully firm.
Notes
- Peanut butter: Use conventional creamy peanut butter like Jif or Skippy for the best texture. Natural peanut butter is too oily and makes the filling difficult to shape.
- Filling too soft? Add more powdered sugar one tablespoon at a time. Make sure the eggs are fully chilled before dipping.
- Filling too dry? Add a teaspoon of peanut butter or a tiny splash of milk and mix until smooth.
- Chocolate too thick? Stir in coconut oil one teaspoon at a time until you reach a smooth, dippable consistency.
- Make ahead: Store in an airtight container in the fridge for up to 2 weeks, or freeze for up to 2 months. Freeze in a single layer first, then transfer to a freezer-safe bag or container.
- Variations: Try dark chocolate or white chocolate coating, mix crunchy peanut butter into the filling, or substitute almond butter or sunflower seed butter for a different flavor or allergy-friendly version.
More No-Bake Easter Candy Recipes
If you want to build a full dessert tray around these chocolate covered peanut butter Easter eggs, pair them with Reese’s peanut butter no-bake bars for another peanut butter treat, add easy cake pops for a fun party bite, or round things out with cookies topped with sugar cookie frosting that hardens for a classic Easter dessert spread.