
There’s something almost sacred about a truly great chocolate ice cream recipe. Not just any kind I mean the kind that hugs your tongue, lingers with silky intensity, and reminds you why dessert is a non-negotiable joy. If you’ve ever churned your way through disappointing batches that tasted too icy, too flat, or just not chocolatey enough… you’re not alone.
This version? It’s different. Crafted through kitchen stumbles and dozens of spoonfuls, it’s designed to hit that elusive sweet spot: rich, deeply chocolatey, smooth-as-glass texture whether you’re using a machine or not. And no, you don’t need a culinary degree (or a 3-hour chill time) to make it happen.
In this guide, I’ll walk you through the chocolate science, share the ingredients that actually matter, show you what to swap if you’re dairy-free or egg-averse, and sprinkle in some clever twists like espresso ripples or almond crunch. If you’re ready to turn your freezer into a small-batch creamery… you’re in the right place
Table of Contents
Ingredients You’ll Need With All the Whys They Don’t Tell You
Let’s be honest most chocolate ice cream ingredient lists feel like a grocery checklist. Useful, sure. But they rarely explain why each thing matters or what could go wrong if you get cocky and sub in oat milk or skip the salt.
So this isn’t a list. It’s a little ice cream manifesto part grocery trip, part kitchen therapy.
Prefer simpler? Try our 2-Ingredient Ice Cream recipe.
🛒 The Lineup — and the Role Each One Plays
Heavy Cream (2 cups)
You want richness? This is where it lives. Not “plant-based creamer” or “half-and-half.” Full-on, unapologetic heavy cream. Anything with at least 36% fat. No, it’s not diet food — it’s ice cream. You knew that coming in.
Whole Milk (1 cup)
This steps in to soften the cream’s dominance. Use 2% if you have to, but skim will betray you with ice shards. Trust me, I tried it once in college with good intentions and bad results.
Dark Chocolate (4 oz, chopped — not chips)
This is where most folks go wrong. You need actual chocolate — not morsels. Those chips you love in cookies? They’re built to not melt. Grab a bar — 60% or more cacao. Something you’d eat straight without flinching.
Unsweetened Cocoa Powder (½ cup)
This is your second layer of chocolate. Think of it like backup vocals that somehow steal the spotlight. Dutch-processed gives you deeper, more velvety notes. Natural cocoa tastes a bit brighter, fruitier. You pick.
Granulated Sugar (¾ cup)
Yes, it sweetens but more importantly, it keeps your ice cream soft. Less sugar = more ice. You want a dessert or a snowball?
Egg Yolks (4 large)
This is where the texture happens. Not thick like pudding, but creamy like… how do I explain this? Like melted Häagen-Dazs, but better. Skip the yolks, and you’ll lose the custardy silk that holds the whole thing together.
👉 Learn more about how egg yolks emulsify and enhance texture.
Vanilla Extract (1 tsp)
Doesn’t scream “vanilla” in the final flavor it just amplifies the chocolate. Like background lighting in a photo. Omit it and everything feels just a little… flat.
Salt (¼ tsp)
If you’ve ever bitten into a chocolate truffle that made your eyes close? That was probably salt doing its secret thing. Just a pinch don’t eyeball it.
🧠 If You’re Tweaking (Because Life Happens)
- No Eggs?
Been there. Use 1 tbsp cornstarch + 2 tbsp full-fat cream cheese. It’s not the same, but it’s also not a disaster. - No Dairy?
Go with full-fat coconut milk and coconut cream. The flavor shifts, but the richness stays. Add a touch of vanilla and salt to keep it grounded. - Want it punchier?
Stir in a bit of espresso powder. It won’t make it taste like coffee it’ll just deepen the chocolate like magic. - Need to cut the sugar?
You can, but only by a few tablespoons. Go too far and it’ll freeze like a brick. I’ve made that mistake more than once.
FAQ What’s the best chocolate to use?
The kind you’d eat alone in the dark after a bad date. Seriously. If you wouldn’t snack on it solo, don’t melt it into your ice cream. 60–70% cacao is the sweet spot not too bitter, not too bland. Bars melt cleanly. Chips are liars.
How to Make It Step by Step, Spoon by Spoon
There’s a quiet kind of joy in making chocolate ice cream from scratch. The way it warms the air with cocoa. The slow stir of custard thickening just right. This isn’t just “mix and freeze” it’s intentional dessert. And once you do it once, it’ll ruin the store-bought stuff forever (in the best way).
🧾 Part 1: The Custard Way (Because It’s Worth It)
- Start slow — melt, don’t scorch.
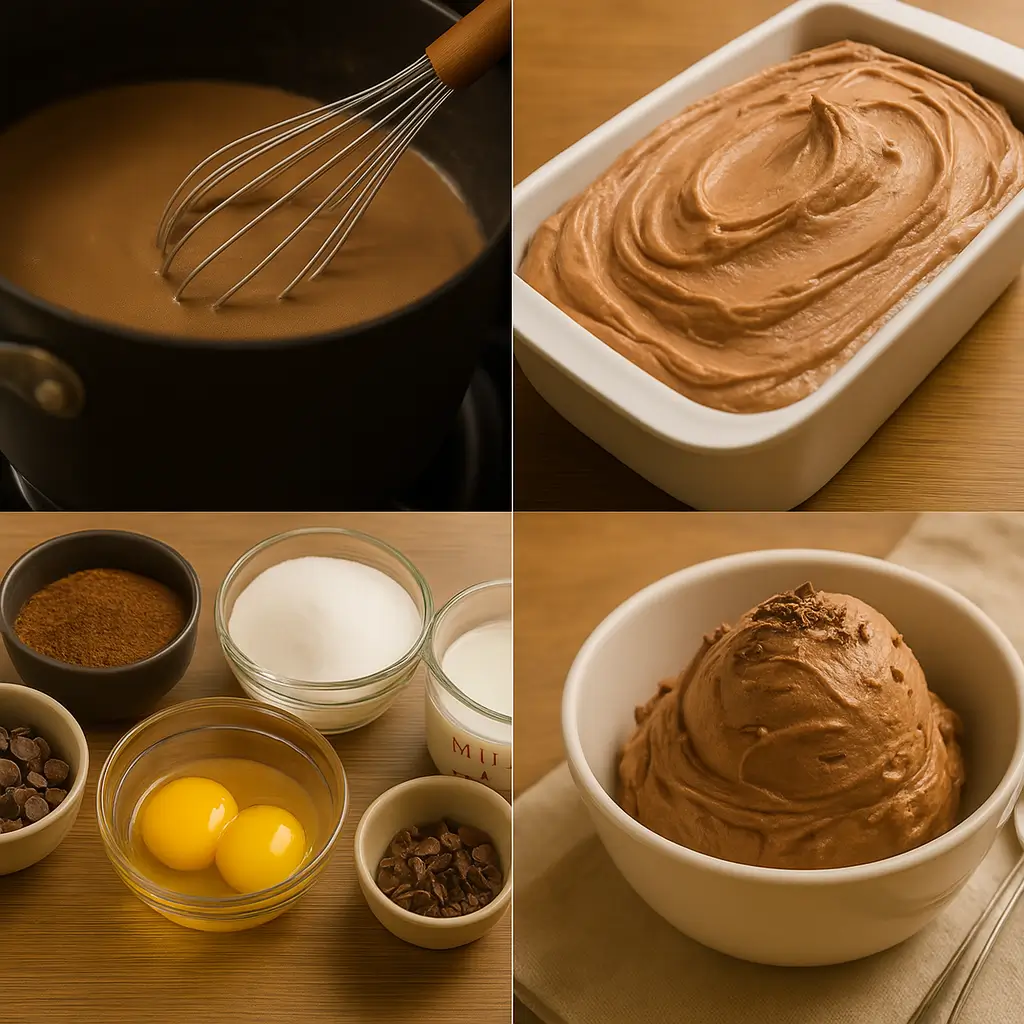
In a medium saucepan, whisk together whole milk, heavy cream, sugar, salt, and cocoa powder.
Set it over medium-low heat and wait. The goal here isn’t boiling — it’s a slow wake-up. When it starts to steam and smell like brownie batter in heaven, you’re ready.
👉 Cue the patience. This is your base. Treat it like it matters. - Add real chocolate — and watch it transform.
Toss in those chopped dark chocolate chunks and stir gently. Watch them melt into the cream like they’ve been waiting for this their whole lives.
It should look smooth and rich, like a silky ganache. If you’re squinting and seeing streaks, just lower the heat and keep stirring. It’ll come around. - Temper those yolks like you mean it.
Whisk your egg yolks in a bowl. Then — slowly, lovingly — add a ladle of hot mixture while whisking constantly. You’re training the eggs to behave. No sudden moves.
Once warmed up, pour them back into the saucepan and give it all a stir.
👉 This is where many bail. Don’t. You’re 5 minutes from magic. - Watch for that spoon test moment.
Keep the heat low. Stir with a wooden spoon or rubber spatula. You’re waiting for the custard to thicken — enough to coat the spoon.
Drag your finger down the back of it. If the line holds? Game on.
Temperature-wise, 170°F (or when it stops being liquid and starts being luscious). - Cool it down. Fast.
Strain it into a clean bowl (just in case any sneaky egg bits got rowdy). Set that bowl in an ice bath — literally, another bowl full of ice water.
Stir now and then until it’s no longer warm, then cover and chill it in the fridge for at least 4 hours.
👉 Overnight? Even better. Chocolate needs time to bloom. - Churn it like you mean it.
Pour the cold custard into your ice cream maker. Let it do its thing. When it looks like soft serve and clings to the paddle? It’s done.
Scoop it into a container, smooth the top, press plastic wrap directly onto the surface (this prevents freezer burn), and freeze another few hours.
🧊 Part 2: The Lazy Genius Version (No Eggs, No Machine)
No time, no yolks, no machine? No worries. This shortcut is surprisingly legit:
- Whip 2 cups of heavy cream to stiff peaks.
- In a separate bowl, mix 1 can sweetened condensed milk, ½ cup cocoa, and melted chocolate.
- Fold the cream in gently.
- Freeze for 6 hours. Done.
👉 Texture’s different — but still creamy enough to make your guests suspicious you didn’t buy it.
Don’t have a machine? Try these no-churn methods.
FAQ — Why does my chocolate ice cream turn icy or crumbly?
Usually? It’s one of three things:
- Not enough fat (whole milk or cream).
- Not enough sugar (which helps prevent freezing solid).
- Churning warm base (always chill your custard thoroughly first).
Custard vs. No-Churn Which Should You Choose?
If you’re standing at the freezer wondering whether to grab your whisk or your electric mixer… pause. Let’s figure out what kind of chocolate ice cream maker you are.
Because both the custard and no-churn versions deliver the goods they just arrive by different roads.
🍮 Option 1: The Custard Route (for flavor lovers and texture nerds)
- What it is: Eggs, heat, stirring, patience.
- Why it rocks: Ultra-smooth texture, deeply developed chocolate flavor, that classic “lick-it-till-it-drips” experience.
- Downside: Takes more time and attention. Involves chilling overnight and a bit of culinary mindfulness.
You’ll love this if:
- You enjoy the process as much as the outcome.
- Texture is your love language.
- You’ve got an ice cream maker or want an excuse to buy one.
👉 Real talk: If you’ve ever swooned over French-style ice cream, this is that.
🧊 Option 2: The No-Churn Way (for shortcut queens and heat-averse kitchens)
- What it is: Sweetened condensed milk + whipped cream + cocoa + melt-in mix magic.
- Why it works: Less equipment, no eggs, barely any hands-on time.
- Downside: Slightly less “dense” texture more mousse-like than custard-style.
You’ll love this if:
- You want chocolate ice cream today, not tomorrow.
- You’re egg-free, dairy-sensitive, or don’t own fancy tools.
- You’ve got a kid, a job, or just zero bandwidth for tempering yolks.
Want chocolate ice cream today, not tomorrow? Try our no-churn strawberries and cream ice cream.
👉 Pro tip: Add a spoon of cream cheese and a swirl of melted chocolate for bonus richness.
FAQ — Can I do half custard, half no-churn?
Not really they use totally different chemistry. But you can take the no-churn route and elevate it by folding in extra melted chocolate or espresso for a more custard-like depth. Think of it as cheating… elegantly.
Best Chocolate for Ice Cream (and Why It Matters More Than You Think)
You’d think chocolate is chocolate, right? I did too until I made two batches side-by-side. One with cheap baking chips. The other with a bar I low-key love to eat straight from the wrapper.
Night and day. One was gritty, oddly flat, kind of “meh.” The other? Rich, smooth, legit scoop-shop level.
So let’s break this down not like a food chemist, but like someone who just really loves dessert.
🟤 The Chocolate Hierarchy (From “It’ll Work” to “Holy YES”)
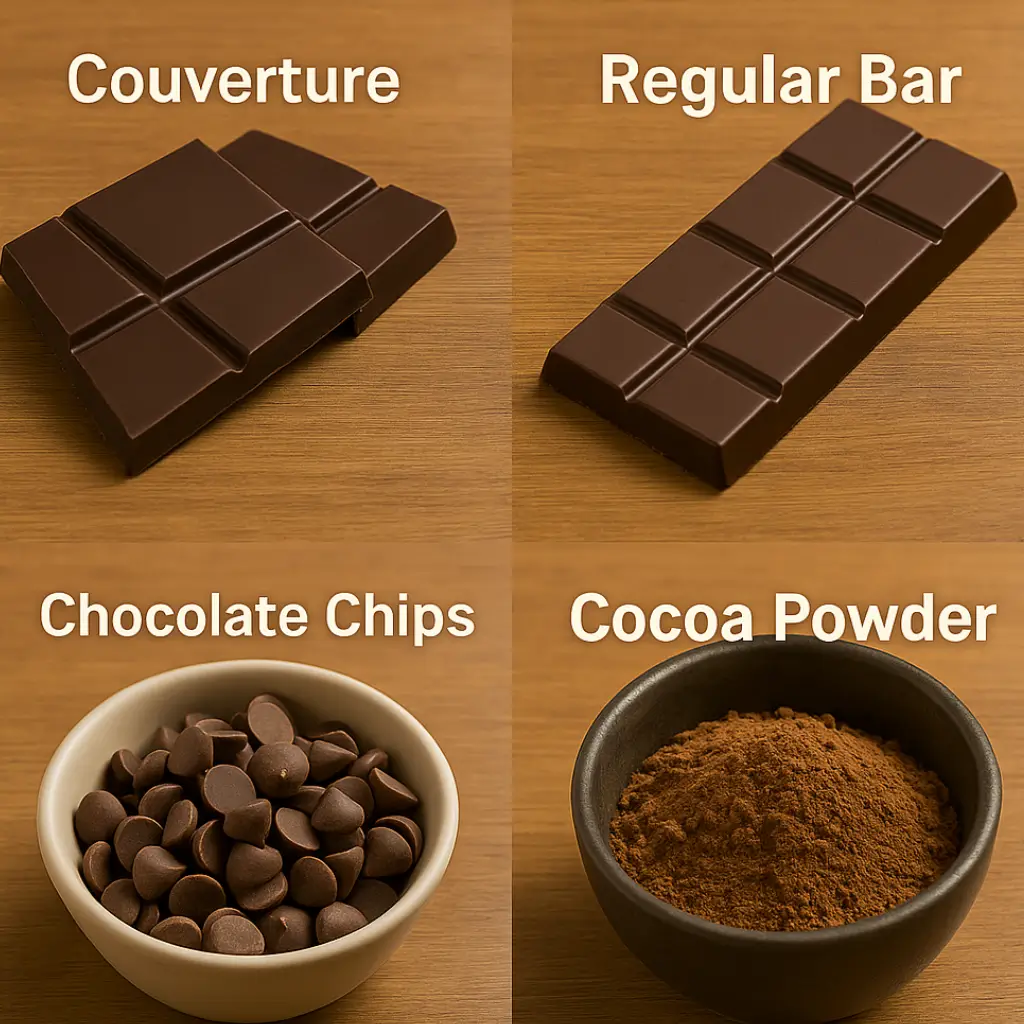
1. Couverture or High-End Baking Bars (60–70% cacao)
- Think Valrhona, Guittard, Ghirardelli baking bars, or Lindt Excellence.
- They melt cleanly, with no weird clumps or greasiness.
- Bonus: Many are designed for emulsifying into custards. You can taste the clarity.
2. Regular Chocolate Bars (Dark or Semi-Sweet)
- If it’s a bar you love to snack on, it’ll work here too.
- Just check that it’s not filled with crunchy bits or nougat (unless you want that in your swirl).
3. Chocolate Chips
- They technically melt, but not well. Most have stabilizers to help them hold shape in cookies great for cookies, bad for ice cream.
- If it’s all you’ve got, melt them low and slow, and whisk hard.
4. Cocoa Powder
- Use as a supporting actor, not the star. Dutch-process brings depth and darker notes. Natural cocoa is a little sharper, tangier might work in a brighter recipe, but not ideal alone.
🧠 How Chocolate Impacts Flavor & Texture
- Higher cacao % = more intensity, less sweetness. That’s why bittersweet (70%) feels more “grown-up” than semisweet (55%).
- Fat content matters. Chocolate with higher cocoa butter levels melts into the base more luxuriously. That’s the difference between “eh” and “wow.”
- Bitterness vs. Bloom. Ever had ice cream that felt harsh or chalky? That’s usually cheap cocoa or over-extracted dark chocolate.
👉 Rule of thumb: If you wouldn’t eat it straight, don’t make it the heart of your ice cream.
FAQ — What if I want it milkier and less intense?
Drop the cacao level a bit — use a mix of semisweet (around 55%) and Dutch cocoa. Add a touch more vanilla or a swirl of marshmallow to brighten it up. Chocolate ice cream doesn’t have to punch you in the face — it can also hug.
Creative Variations and Mix-Ins (Because Plain is Just a Starting Point)
Don’t get me wrong classic chocolate ice cream is a vibe. But once you master the base, it’s hard not to start wondering: What if I added peanut butter? Or a whiskey ripple? Or cinnamon and a little chaos?
Here’s where you let your freezer become your playground.
🥃 Boozy Twists (Adults Only, Please)
- Espresso Liqueur or Amaro (1–2 tbsp)
Adds bitter complexity that makes the chocolate feel fancier than it has any right to be. - Bourbon or Spiced Rum (1 tbsp max)
Warms the flavor and softens texture — just don’t overdo it or it won’t freeze properly. - Bailey’s or Coffee Cream Liqueur
Creamy, mellow, and dessert-y. Great if you want something rich without a harsh bite.
👉 Pro tip: Alcohol lowers freezing point. Use modestly, or your scoop might turn slushy.
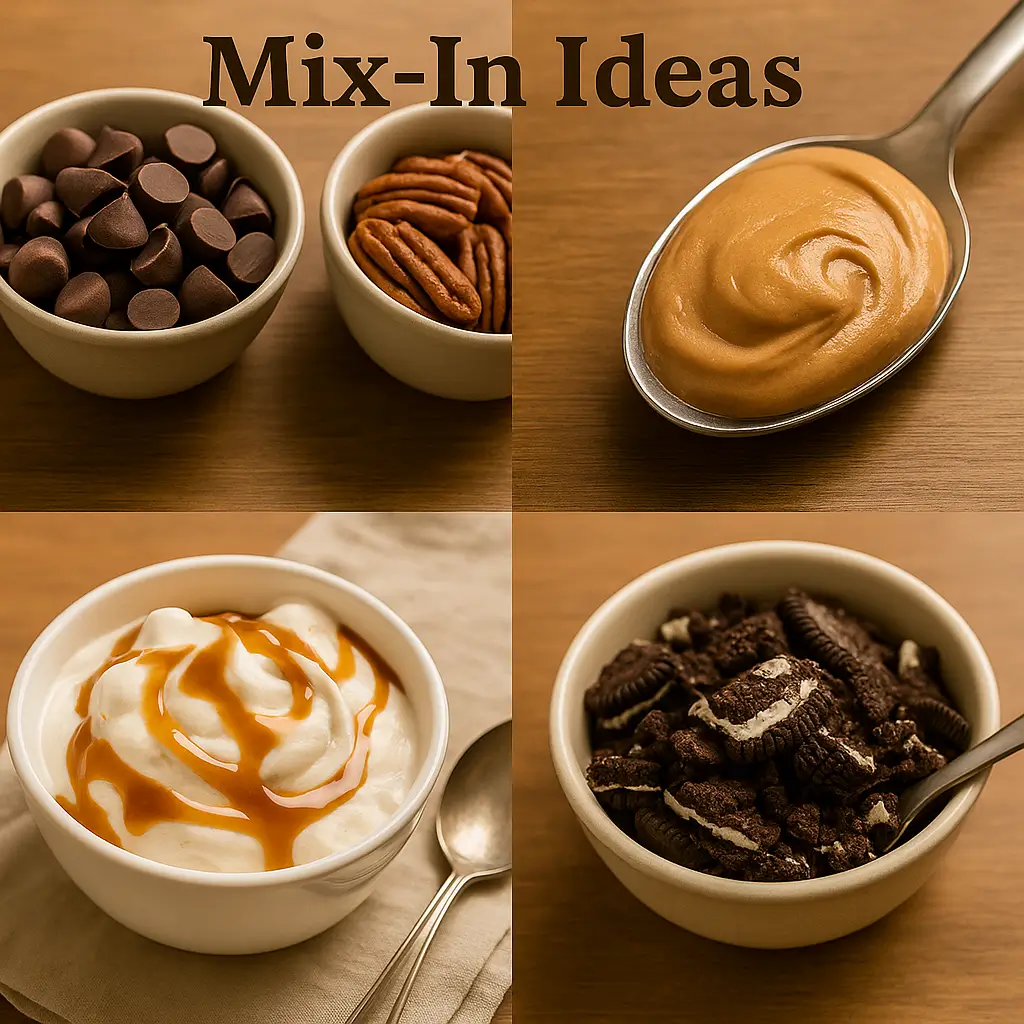
🍫 Textural Add-Ins (Crunch, Chew, Swirl)
- Chocolate Chunks or Shaved Chocolate
Keep them small — big bites harden too much. - Toasted Nuts (pecans, almonds, hazelnuts)
Add crunch and contrast. Salt them lightly for bonus effect. - Peanut Butter or Almond Butter Ribbons
Warm slightly and swirl post-churn for layered bites. - Marshmallow Fluff or Caramel Drizzle
Think rocky road’s cooler cousin. - Crushed Cookies or Brownie Bits
A spoonful of nostalgia in every bite. Oreos, graham crackers, stroopwafels — anything goes.
🌶 Flavor Bends (A Little Wild, But Worth It)
- Cayenne + Cinnamon (aka Mexican chocolate)
A slow-building heat with warm spice. Shocking at first, addicting after. - Miso + Chocolate Swirl
Salty, savory, sweet. Don’t knock it ’til you try it. - Mint Extract or Crème de Menthe (½ tsp)
Refreshing. Pairs beautifully with dark chocolate chunks. - Coconut Flakes + Rum
A tropical nod that makes you feel like you’re on a hammock, even if it’s just your couch.
🧠 When to Add Mix-Ins
- Swirls (caramel, nut butter, marshmallow)
Add after churning, during container transfer. Gently fold with a spoon to ribbon it. - Chunks (nuts, cookies, chocolate bits)
Add during the last minute of churning — not sooner, or they’ll sink.
FAQ — Can I split the batch for two flavors?
Absolutely. Right after churning, divide it in half. Swirl peanut butter into one, mix crushed Oreos into the other. Boom: two flavors, same effort. Your future self will thank you.
How to Fix Common Ice Cream Problems (No Panic Required)
Let’s be honest homemade chocolate ice cream can break your heart a little when it goes wrong. One minute you’re swirling velvety custard into the machine, the next you’re digging into a frozen brick that tastes like regret.
But here’s the thing: most fails are fixable. Or better yet, preventable.
Here’s what goes wrong, why, and how to rescue the next batch.
La Cucina Italiana highlights 5 Mistakes to Avoid in Homemade Ice Cream—spot on with fat, temp, churn, and more.
🧊 Problem 1: It’s Rock-Hard and Icy
Why it happens:
- Base wasn’t chilled enough before churning.
- Not enough fat or sugar to soften it.
- Over-churned until air was knocked out.
How to fix it next time:
- Chill your base overnight cold base = smooth churn.
- Don’t skimp on cream or sugar. They’re texture insurance.
- Add 1 tbsp of corn syrup or alcohol (like vodka) to soften the freeze.
- Let your ice cream sit at room temp 10 minutes before scooping — not optional.
🥚 Problem 2: Custard Curdled (scrambled eggs, basically)
Why it happens:
- Heat too high while cooking.
- Added egg yolks to hot base too fast.
How to fix it next time:
- Temper yolks slowly — drizzle, don’t dump.
- Keep stove on low. Stir constantly. Watch the texture, not the clock.
- Strain the base after cooking. You’d be surprised what gets caught.
👉 Bonus tip: If it curdles slightly but still tastes good, blend it smooth before chilling. Texture won’t be perfect, but it’s still better than tossing it.
🍫 Problem 3: It Tastes Weirdly… Flat
Why it happens:
- Low-quality chocolate or too little cocoa.
- Skipping salt or vanilla.
- No espresso or flavor-enhancer.
How to fix it next time:
- Use good chocolate — seriously, it matters more than you think.
- Add a pinch more salt. It’s magic.
- A splash of espresso powder or even dark coffee deepens the flavor like nothing else.
🧠 Quick Fix Table:
| Problem | Likely Cause | Next-Time Fix |
| Icy texture | Low fat or sugar, warm base | More cream, chill base fully |
| Scrambled eggs | Heat too high, poor tempering | Slow down, strain everything |
| Too bland | Cheap chocolate, no salt | Use high-quality bars, boost flavor enhancers |
| Too soft | Under-churned or too much alcohol | Limit booze, freeze longer |
| Rock solid | No softeners like syrup or alcohol | Add 1 tbsp corn syrup or vodka |
FAQ — Can I fix already-frozen icy ice cream?
Sort of. Let it soften, then reblend it with a splash of cream. Refreeze in a shallow container. It won’t be perfect, but it’ll be smoother — and way less sad.
FAQs About Chocolate Ice Cream
You’ve got questions. Maybe you’re mid-recipe. Maybe you’re doomscrolling while your custard chills. Either way — here are the answers you didn’t know you needed (but kind of hoped someone would spell out).
What’s the difference between Dutch cocoa and regular?
Dutch-process cocoa is treated to neutralize acidity. That means it’s darker, smoother, and a little more grown-up in flavor. Regular (natural) cocoa has brighter, fruitier tones. For chocolate ice cream, Dutch usually wins — it melts into the base like a dream and amplifies the richness.
Do I really need an ice cream maker?
Nope — but it helps. With one, you’ll get better air incorporation and smoother texture. Without it, you can still win using whipped cream + sweetened condensed milk (see No-Churn method above). Just know the result will be slightly denser and more mousse-like. Still delicious.
Can I use almond milk or oat milk?
Technically yes, but you’ll need backup fat. Almond or oat milk alone won’t deliver the creamy body you expect. Combine them with full-fat coconut cream or cashew butter to even things out. Also: expect more icy texture unless you up the sugar or add a softener like corn syrup.
How long does homemade chocolate ice cream last?
About 1–2 weeks in the freezer before texture starts to degrade. Keep it in an airtight container with plastic wrap pressed against the surface. If it’s rock solid after a week, let it sit out 10 minutes before scooping and don’t microwave it. (Please. Just don’t.)
Why does my chocolate ice cream taste dull after freezing?
Cold dulls flavors especially chocolate. That perfect taste you had during churning? It fades a bit once frozen. That’s why pros add espresso powder, vanilla, salt, or even a touch of alcohol they enhance and preserve flavor under cold temps.
Serving, Storage & Freezing Tips
So you made it. Your freezer’s cradling a tub of rich, homemade chocolate ice cream and you’re already thinking about that first perfect scoop. But hold up — how you store and serve it matters just as much as how you made it.
Really Simple nails the freezer-burn prevention: How to Remove and Prevent Freezer Burn on Ice Cream.
Here’s how to keep your masterpiece silky, scoopable, and ready to impress.
🍨 Scooping Tips (aka Avoiding the Ice Pick Method)

- Let it sit. Take the container out and let it rest on the counter for 7–10 minutes. Seriously, don’t skip this. Straight-from-the-freezer scooping is a shoulder workout no one asked for.
- Warm the scoop. Run your metal scoop under hot water before using it. Repeat between scoops. Makes a world of difference.
- Don’t dig. Glide. Start around the edges and roll the scoop like a melon baller. You’ll get beautiful curls instead of concrete chunks.
🧺 Storage Secrets (Keep It Tasting Like Day One)
- Use a shallow, wide container. It freezes faster (less ice crystal formation) and scoops easier. Metal loaf pans or silicone tubs work well.
- Press plastic wrap or parchment onto the surface. This keeps air out and prevents freezer burn — the enemy of all frozen joy.
- Label with the date. Homemade ice cream is best within 1–2 weeks. After that, texture and flavor start to fade. You probably won’t wait that long anyway.
- Don’t store it in the door. Keep it deep in the freezer where temps are stable.
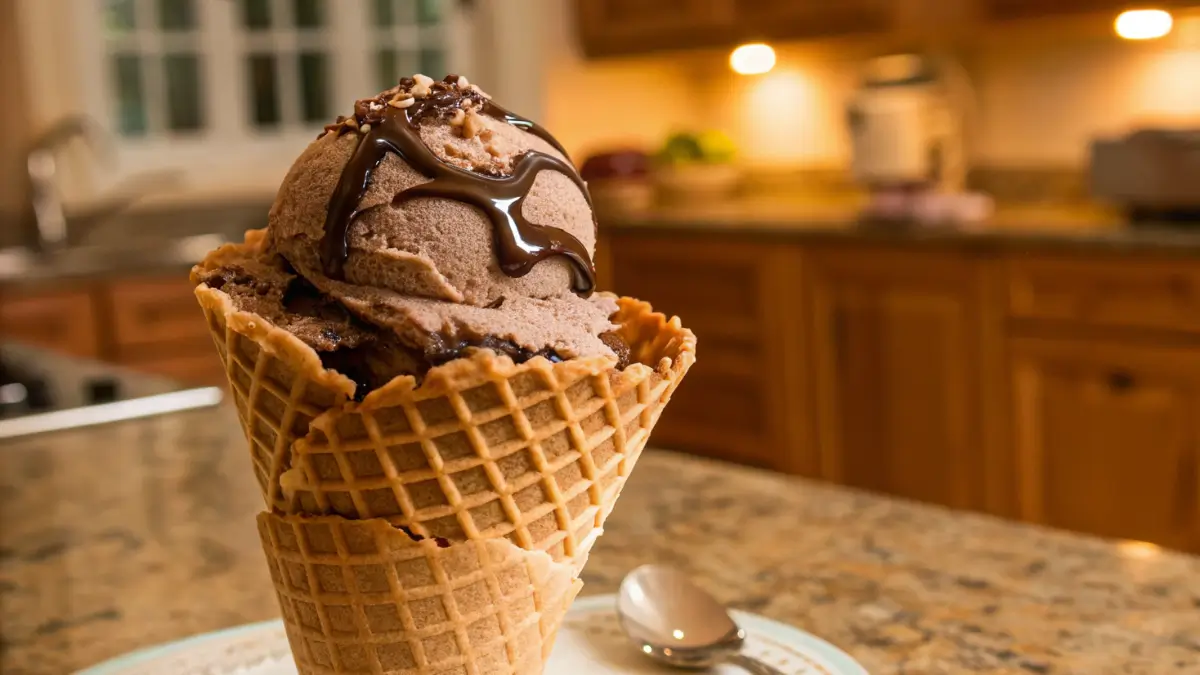
🎨 Presentation Touches (If You’re Serving to Impress)
- Sprinkle sea salt or cocoa nibs on top right before serving — adds texture and contrast.
- Scoop into pre-chilled bowls or cones to prevent melting too fast.
- Drizzle with warm fudge, espresso shot, or bourbon caramel for that over-the-top flourish.
- Interested in egg-free classics? Check out our Grape Nut Ice Cream.
FAQ — Can I re-freeze melted ice cream?
Technically yes, but… no. Once melted, ice cream loses its structure and re-freezing gives you a sad, icy slab. If it’s only partially softened, you can whip and re-freeze with a splash of cream. But full melt? Use it in a milkshake or iced coffee. Or, honestly, just eat it.
Conclusion: The Scoop That Started It All
If you made it this far whether reading or actually churning away in your kitchen then you’re probably not someone who settles for just okay chocolate ice cream. And honestly? That’s the difference between following a recipe and making one your own.
You now know how to turn a handful of basic ingredients into something rich, deeply flavored, and let’s be real better than most grocery store pints. Whether you went full custard with egg yolks and tempering, or took the shortcut no-churn path and added your own twist, this isn’t just another chocolate ice cream recipe. It’s yours now.
So take that first scoop slowly. Share it, or don’t. Freeze the rest. Swirl in something wild next time. And if you surprise yourself with how good it turned out? Even better.
If you try it, I’d love to hear how it went drop your tweaks, your triumphs, even your flops in the comments. Every batch tells a story.
Want to geek out further? Read Jeni’s Splendid Ice Cream’s origin story — a real-world brand born from backyard experimentation.