

There’s something magical about pulling a bubbling chicken cobbler from the oven on a chilly evening. The aroma fills your kitchen with promises of comfort and satisfaction as the golden biscuit topping rises above the creamy chicken filling. This easy chicken cobbler recipe has become my family’s most requested dinner, combining the hearty goodness of a chicken casserole with the comfort of fresh-baked biscuits.
Unlike its sweet fruit cousins, this savory chicken cobbler brings together tender chicken pieces, colorful vegetables, and a velvety sauce topped with fluffy biscuits that bake to perfection. Whether you’re looking for a way to use leftover rotisserie chicken or want to create a memorable family dinner from scratch, this one-pan wonder delivers on flavor and simplicity.
Table of Contents
What is Chicken Cobbler?
Chicken cobbler is essentially a savory version of the classic dessert cobbler, featuring a hearty chicken and vegetable mixture on the bottom with a biscuit topping that resembles cobblestones once baked (hence the name “cobbler”). It’s a close cousin to chicken pot pie but with a distinctly different topping style.
This dish has deep roots in Southern cooking traditions, where home cooks have long transformed simple ingredients into satisfying meals. Unlike a chicken pot pie with its full pastry enclosure, chicken cobbler leaves the filling partially exposed, allowing the biscuits to develop a beautiful golden crust while soaking up some of the savory sauce beneath.
Many food historians believe that savory cobblers evolved as practical solutions for using available ingredients during lean times. Today, they remain popular as the perfect middle ground between a stew and a casserole – substantial enough to serve as a complete meal but still offering the comfort of fresh-baked goods.
Why You’ll Love This Recipe
This homemade chicken cobbler recipe stands out for several compelling reasons:
- Family-friendly comfort food that appeals to all ages and tastes
- Versatile enough to accommodate whatever vegetables you have on hand
- Make-ahead friendly for busy weeknights when time is tight
- One-pan convenience that minimizes cleanup
- Perfect balance of protein, vegetables, and carbs for a complete meal
- Customizable to meet different dietary needs or preferences
The combination of a creamy chicken filling with a flaky biscuit topping creates a textural contrast that makes each bite interesting. The filling stays moist and flavorful while the biscuits provide a satisfying crunch on top with a tender middle where they meet the sauce.
I’ve served this at everything from casual family dinners to potlucks, and the dish always returns empty. Even picky eaters tend to clean their plates when this chicken and biscuit casserole appears on the table.
Ingredients for the Perfect Chicken Cobbler
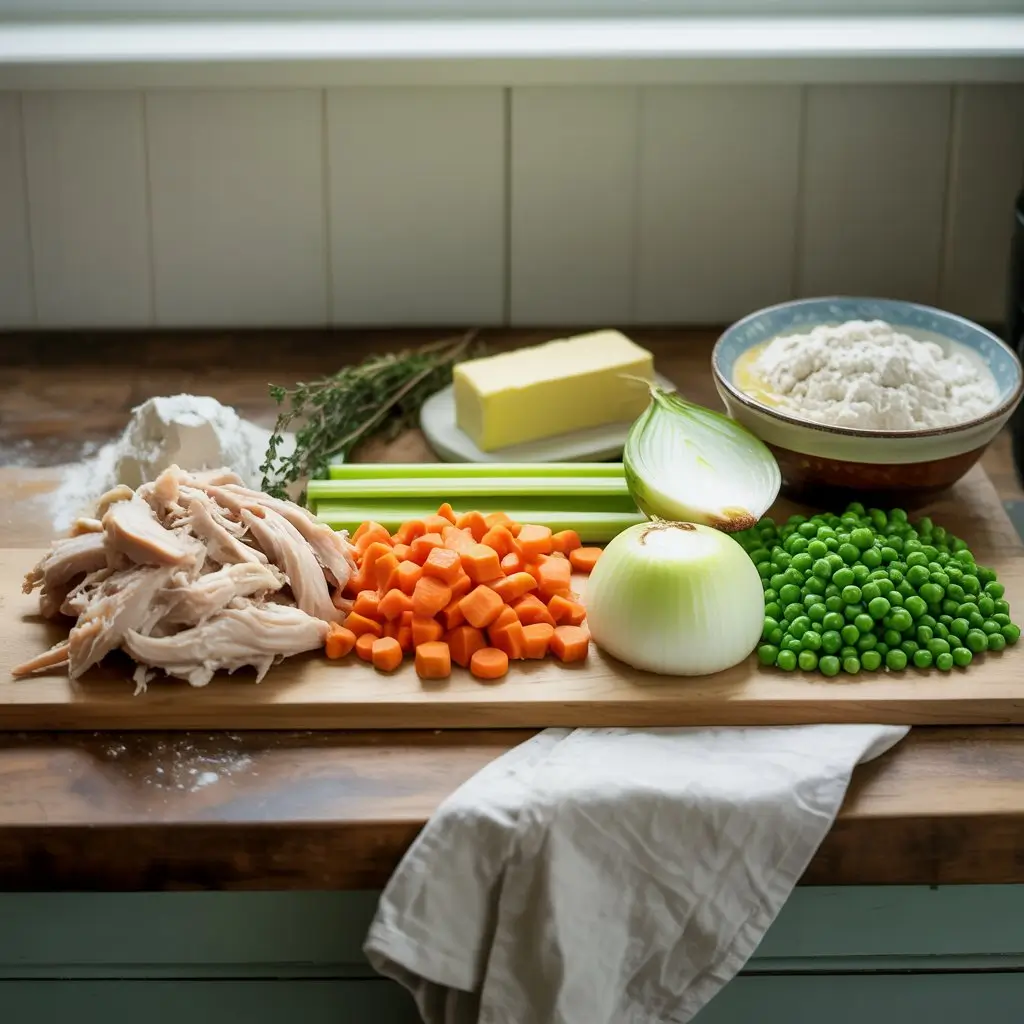
For the Creamy Chicken Filling:
- Chicken – 3 cups cooked and shredded (either from 2 large boneless chicken breasts, 4-5 thighs, or a store-bought rotisserie chicken)
- Onion – 1 medium, diced
- Carrots – 2 medium, diced
- Celery – 2 stalks, diced
- Frozen peas – 1 cup
- Garlic – 2 cloves, minced
- Butter – 4 tablespoons
- All-purpose flour – 1/3 cup
- Chicken broth – 2 cups (low sodium preferred)
- Half-and-half – 1 cup (or substitute whole milk or cream)
- Fresh thyme – 1 tablespoon chopped (or 1 teaspoon dried)
- Salt and pepper – to taste
- Optional add-ins – 1/2 cup mushrooms, 1/4 cup white wine, or 1/2 teaspoon poultry seasoning
For the Flaky Biscuit Topping:
- All-purpose flour – 2 cups
- Baking powder – 1 tablespoon
- Salt – 1/2 teaspoon
- Cold butter – 6 tablespoons, cubed
- Cold buttermilk – 3/4 cup
- Optional flavor enhancers – 1/2 cup shredded cheddar cheese, 1 tablespoon chopped fresh herbs, or 1/4 teaspoon garlic powder
Using quality ingredients makes a big difference in this recipe. I prefer organic vegetables when possible and always use real butter rather than margarine for the best flavor. For those short on time, a good-quality rotisserie chicken from the grocery store works beautifully and adds an extra layer of flavor to the filling.
Equipment Needed
One thing I love about this chicken cobbler recipe is that it doesn’t require fancy equipment:
- A 9×13 baking dish or 12-inch cast iron skillet
- Large mixing bowl
- Medium saucepan
- Measuring cups and spoons
- Cutting board and sharp knife
- Wooden spoon or silicone spatula
- Pastry cutter or two forks (for the biscuit topping)
The cast iron skillet option allows you to sauté the vegetables and make the sauce all in one pan before adding the topping and baking, which means one less dish to wash. However, a standard baking dish works perfectly well too.
Step-by-Step Instructions
Preparing the Chicken Filling

- Preheat your oven to 400°F (200°C). If you’re new to making biscuit toppings, King Arthur Baking’s biscuit guide is a fantastic resource.
- Cook your chicken if not using rotisserie: Season chicken breasts or thighs with salt and pepper, then bake or poach until cooked through (about 25 minutes in the oven or 15 minutes in simmering water). Let cool slightly before shredding with two forks. Skip this step if using pre-cooked rotisserie chicken.
- Sauté the vegetables: In a large skillet or Dutch oven, melt 2 tablespoons of butter over medium heat. Add diced onions, carrots, and celery, cooking until softened (about 5-7 minutes). Stir in the finely chopped garlic, letting its sharp aroma bloom and soften for about half a minute, releasing its rich, pungent essence into the sautéing vegetables
- Make the creamy sauce: Add the remaining 2 tablespoons of butter to the vegetable mixture. Once melted, sprinkle in the flour and stir continuously for 1-2 minutes to cook out the raw flour taste. Stream in the chicken broth, whisking energetically to banish any stubborn flour lumps.Add half-and-half, thyme, salt, and pepper. Simmer for 3-5 minutes until the sauce thickens to a gravy-like consistency.
- Complete the filling: Add the shredded chicken and frozen peas to the sauce mixture, stirring to combine everything evenly. If using additional vegetables like mushrooms, add them now. Remove from heat and transfer to your baking dish if not using an oven-safe skillet.
Making the Biscuit Topping
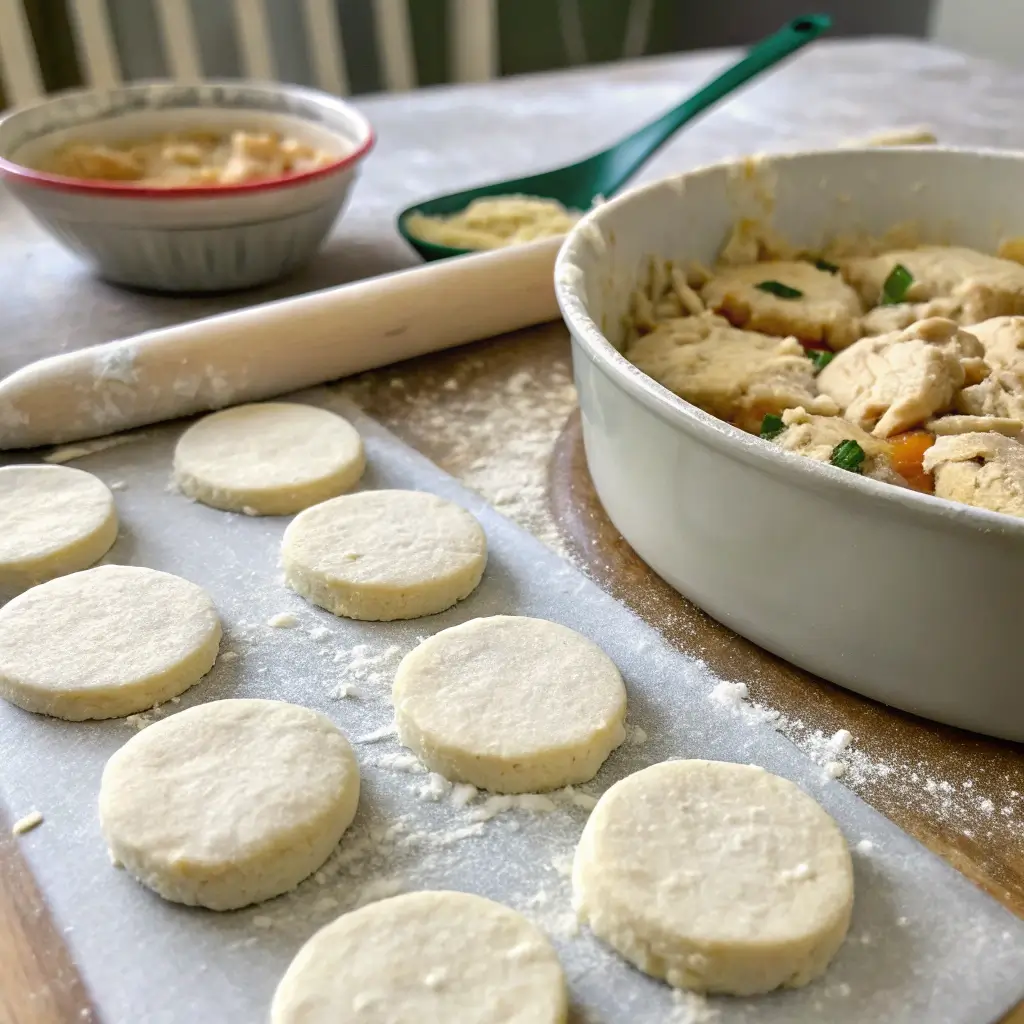
- Combine dry ingredients: In a large bowl, whisk together flour, baking powder, and salt.
- Cut in the butter: Using a pastry cutter, two forks, or clean fingertips, cut the cold butter into the flour mixture until it resembles coarse crumbs with some pea-sized pieces remaining. This cold butter is critical for creating flaky layers in your biscuits.
- Add liquid: Pour in the cold buttermilk and stir just until the dough comes together. Overmixing will result in tough biscuits, so use a light hand. If adding cheese or herbs, fold them in gently at this point.
- Form the biscuits: Turn the dough onto a lightly floured surface and pat it to about 3/4-inch thickness. Using a 2.5-inch biscuit cutter or drinking glass, cut out rounds. Alternatively, you can simply drop spoonfuls of the dough onto the filling for a more rustic look.
- Top the filling: Arrange the biscuits over the hot chicken filling, leaving small gaps between them to allow steam to escape and the filling to bubble up slightly.
Baking Instructions
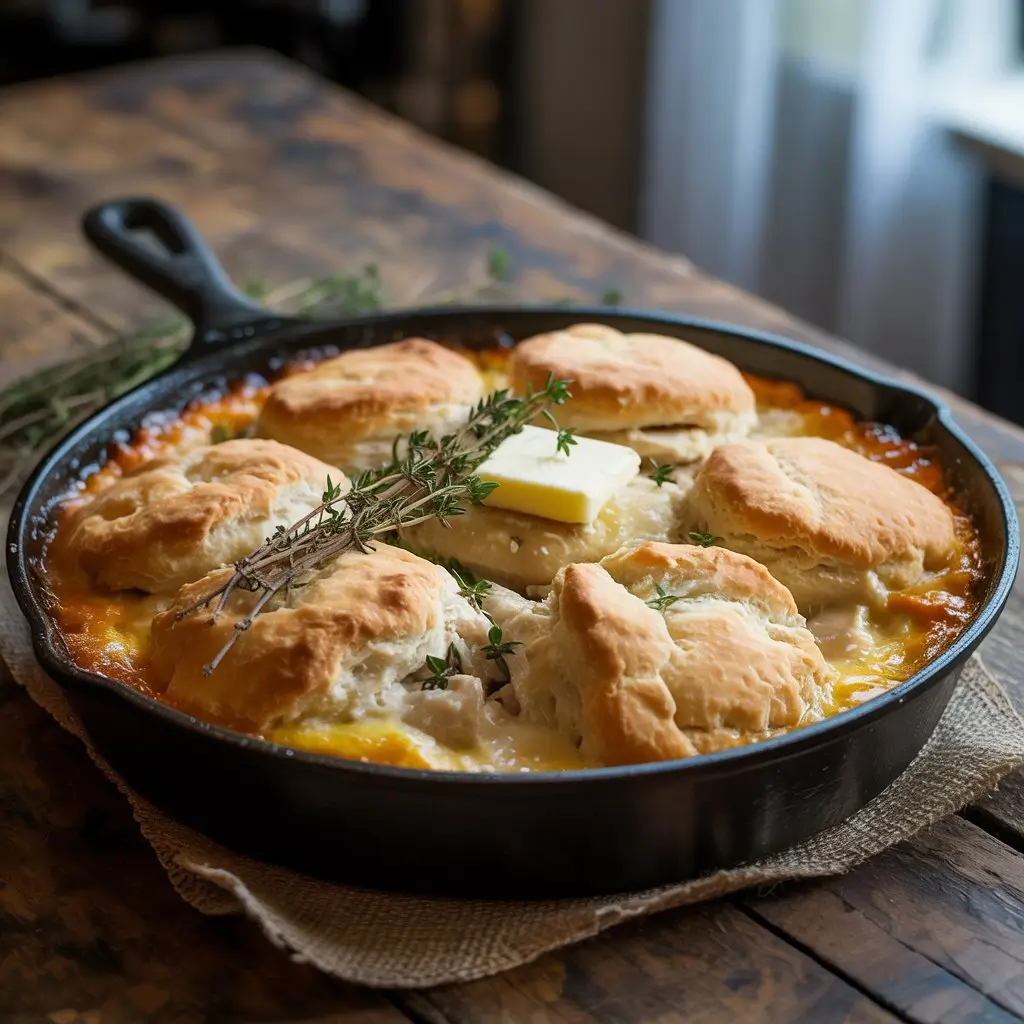
- Bake uncovered for 25-30 minutes, until the biscuits are golden brown and the filling is bubbling around the edges.
- Check for doneness: The internal temperature of the cobbler should reach 165°F, and a toothpick inserted into a biscuit should come out clean.
- Rest before serving: Allow the chicken cobbler to rest for 10-15 minutes before serving. This helps the sauce thicken slightly and prevents tongue-burning temperatures.
I often brush the tops of the biscuits with melted butter about 5 minutes before they’re done baking. This gives them an extra golden shine and adds another layer of buttery flavor.
Variations and Substitutions
Transform this chicken cobbler to fit virtually any dietary plan or personal taste:
Gluten-Free Options
- Replace all-purpose flour with a 1:1 gluten-free flour blend in both the filling and topping
- Use cornstarch instead of flour to thicken the sauce (about half the amount)
- Try a cornbread topping made with gluten-free cornmeal
Dairy-Free Adaptations
- Substitute plant-based butter in equal amounts
- Use unsweetened almond milk, oat milk, or coconut milk instead of half-and-half
- Make dairy-free buttermilk by adding 1 tablespoon of lemon juice to your preferred plant milk
Vegetable Variations
- Spring mix: asparagus, leeks, and peas
- Fall harvest: butternut squash, kale, and cranberries
- Garden bounty: zucchini, bell peppers, and corn
Alternative Toppings
- Drop biscuits (simply spoon the dough rather than rolling and cutting)
- Store-bought biscuit dough (in a pinch)
- Puff pastry squares for a quicker but still impressive topping
- Cornbread topping for a Southern twist
When I’m in a hurry, I’ve been known to use canned biscuits on top, though the homemade version is definitely worth the extra few minutes when you have time.
Make-Ahead, Storage, and Freezing Instructions
One of the best things about this chicken cobbler recipe is its make-ahead potential:
For more on freezing and reheating casseroles, see The Spruce Eats: How to Freeze and Reheat Casseroles.
Make-Ahead Options
- Prepare the filling up to 2 days in advance and refrigerate in an airtight container
- Mix the dry biscuit ingredients and cut in butter ahead of time; store in the refrigerator and add liquid just before baking
- Assemble the entire dish up to 24 hours before baking, cover, and refrigerate (add 10-15 minutes to baking time if baking cold)
Storage
- Refrigerate leftovers in an airtight container for up to 3 days
- For best results, reheat in a 350°F oven for 15-20 minutes rather than using a microwave, which can make the biscuits soggy
Freezing
- Before baking: Prepare the filling and freeze in a freezer-safe container. Make and freeze biscuit dough separately. Thaw both in the refrigerator overnight before assembling and baking.
- After baking: Freeze individual portions in airtight containers for up to 3 months. Let the cobbler defrost in the fridge overnight, then warm gently in the oven to revive its freshly-baked charm.
I often make a double batch of this recipe specifically to freeze half for future busy nights. There’s nothing better than having a home-cooked meal ready to go when life gets hectic.
Serving Suggestions
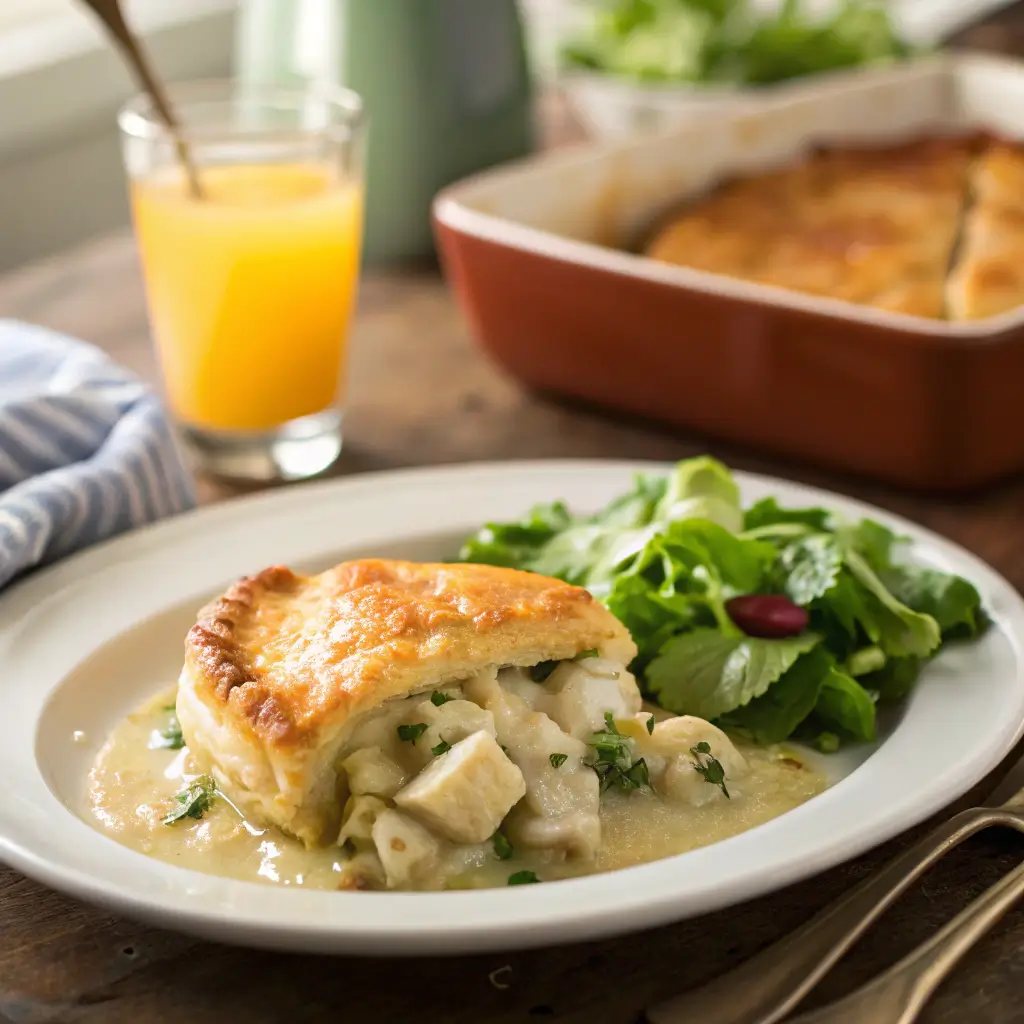
This chicken cobbler is hearty enough to stand alone as a complete meal, but if you’re feeding a crowd or want to round out the table:
- A simple green salad with vinaigrette dressing
- Steamed green beans or broccoli with lemon
- Cranberry sauce for a touch of sweetness and acidity
- A glass of crisp white wine like Sauvignon Blanc or Chardonnay
For a special touch when serving guests, I like to sprinkle some fresh chopped parsley or thyme over the top just before bringing it to the table. The pop of green color makes the golden biscuits look even more appealing.
Frequently Asked Questions
How do you make chicken cobbler from scratch?
The process involves three main steps: preparing a creamy chicken and vegetable filling, making a simple biscuit dough for the topping, and baking them together until the filling is bubbly and the biscuits are golden. The complete step-by-step instructions are detailed above.
Can I use rotisserie chicken in chicken cobbler?
Absolutely! Pre-cooked rotisserie chicken is an excellent time-saver and adds great flavor. Simply remove the meat from the bones and shred or chop it before adding to your sauce mixture. One medium rotisserie chicken typically yields about 3-4 cups of meat, perfect for this recipe.
What vegetables go well in chicken cobbler?
Traditional vegetables include carrots, celery, onions, and peas, but feel free to customize based on what’s in season or what your family enjoys. Other good options include:
Mushrooms (add with the onions)
Potatoes (par-boil before adding)
Sweet potatoes (par-boil before adding)
Corn (fresh or frozen)
Green beans (blanched)
Leeks (instead of or in addition to onions)
Can chicken cobbler be made ahead of time?
Yes! Prep the filling in advance and tuck it into the refrigerator up to two days before your meal. The biscuit topping is best made just before baking, though you can mix the dry ingredients and cut in the butter ahead of time. You can also assemble the entire dish up to 24 hours before baking – just add a few extra minutes to the baking time if it goes into the oven cold.
How do you store and reheat chicken cobbler?
Seal the remaining chicken cobbler in a tight container, where it’ll keep nicely in the fridge for three days. For the best texture, reheat in a 350°F oven for 15-20 minutes until heated through. While microwave reheating works in a pinch, it can make the biscuits soggy.
Is chicken cobbler the same as chicken pot pie?
Chicken cobbler and pot pie share similar fillings, but their crusts tell different stories. Pot pie typically has a pastry crust on top (and sometimes on the bottom as well), while cobbler features biscuit dough that’s either cut into rounds or dropped by spoonfuls over the filling, creating a cobblestone appearance.
Can I freeze chicken cobbler?
Yes! Chicken cobbler freezes well either before or after baking. If freezing before baking, I recommend freezing the filling and biscuit dough separately, then assembling just before baking. If freezing after baking, portion into individual servings for easier reheating. Frozen cobbler will keep for up to 3 months.
How do you make chicken cobbler gluten-free?
To make this recipe gluten-free, substitute the all-purpose flour with a 1:1 gluten-free flour blend in both the filling and biscuit topping. For the filling, you can also thicken with cornstarch instead of flour (use half the amount). Double-check that your chicken broth meets gluten-free standards.
Tips for Success
After making this chicken cobbler recipe countless times over the years, I’ve gathered some helpful tips:
- Keep ingredients cold for the biscuit topping. Cold butter and buttermilk create steam pockets that make the biscuits flaky.
- Don’t overmix the biscuit dough – handle it as little as possible for tender results.
- Thicken the filling properly before adding the topping. Aim for a sauce that drapes elegantly over a spoon, thick yet fluid.
- Allow space between biscuits when placing them on the filling so they have room to expand and the filling can bubble up around them.
- Place the baking dish on a sheet pan before putting it in the oven to catch any potential overflow.
- Let the cobbler rest for 10-15 minutes after baking to allow the filling to set slightly.
- Check the middle biscuits for doneness – they sometimes take longer than the edge pieces.
For an extra-special touch, add a small pinch of herbs or cheese to the top of each biscuit before baking. I sometimes make a small well in the center of each biscuit and add a tiny pat of butter for an extra-rich finish. For expert biscuit tips, see Sally’s Baking Addiction: Biscuit Baking Tips.
1 thought on “The Best Chicken Cobbler Recipe: Homemade Comfort Food in One Pan”